After ...S-4c
Moves from Diagram 1:
1. P-8e Px8e
2. P*8d ---> (Diagram 2)
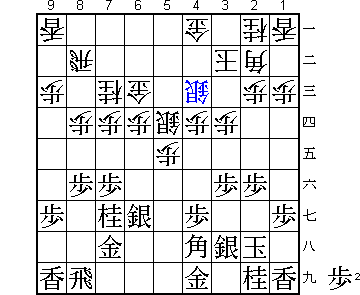
Diagram 1 shows black's opposing rook versus white's static rook. White has just played ...S-4c to reinforce his castle.
Black is being pressured at the midpoint of the board. However, black has 2 pawns in hand as well as rook at 8i and bishop at 7h keeping their eyes on the 8th file. It is thus still possible to recover his losses.
In this position, black played 1. P-8e Px8e 2. P*8d to counterattack the rook's head. Although this play belongs to "attack" rather than "defense", I dared to introduce this as a "defense of counterattack" because black has a great defensive move afterwards.
|
Diagram 1
After ...S-4c Moves from Diagram 1:
|
Considing the full-board situation, 1. P-8e is a natural counterattack for black. If he dawdles, white will threaten to open his Bishop's line with ...P-4e, putting black in an unpleasant position.
If instead of 1... Px8e white plays 1... Nx8e, 2. Nx8e Px8e 3. P*8c Rx8c 4. P*8d (Diagram A) followed by 5. Rx8e will be very strong for black.
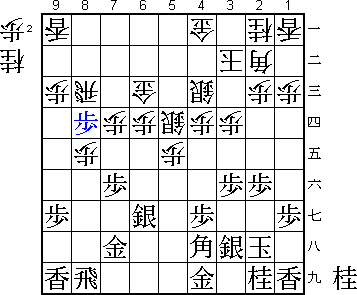 |
Diagram A
After 4. P*8d |
If, in the main line after 1... Px8e, black plays 2. P*8c, then 2...Rx8c 3. P*8d R-8a 4. Nx8e P-4e (Diagram B). In Diagram B, white's 5... Gx7c is a good answer to 5. Nx7c+ and the defense of the 8th file holds strong.
 |
Diagram B
After 4... P-4e |
Therefore 2. P*8c is an overplay. 2. P*8d, dropping the pawn one square further back (Tare-fu = "Hanging Pawn"), is correct.
 |
Diagram 2
After 2. P*8d Moves from Diagram 2:
|
White's 2... P-4e is the best move in this situation. He has no good way to prevent black's counterattack on the 8th file (Knight's jump to 8e). Therefore he activates his bishop which so far has done no work at all, and aims to answer 3. Nx8e with 3... P-5f (Diagram C), opening the bishop's line.
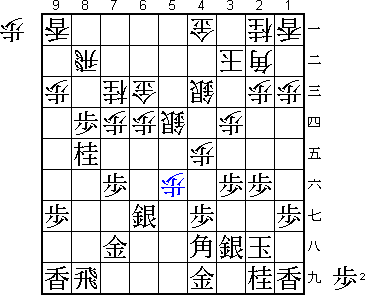 |
Diagram C
After 3... P-5f |
The purpose of 3. K-1h is to dodge white's counterattack before it happens. This technique (tesuji) is called "hayanige" or "early escape". If black hurries to attack with 3. Nx8e instead, his position will be disadvantageous after 3... P-5f 4. Sx5f Nx8e 5. Rx8e N*4d (Diagram D). The Knight drop at 4d interestingly aims not only at the silver on 5f, but the fork of king and bishop by to Nx3f. 3. K-1h avoids this.
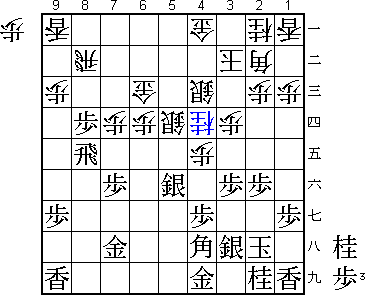 |
Diagram D
After 5... N*4d |
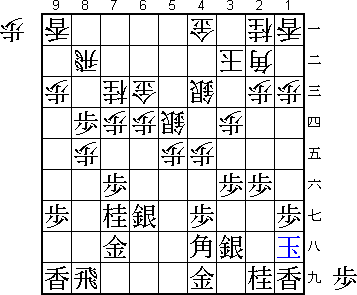 |
Diagram 3
After 3. K-1h Moves from Diagram 3:
|
There is a shogi proverb, "Early escape is worth three moves". 3. K-1h is a perfect example of what this means, and is completely successful in silencing white's counterattack (P-5f). If white pushes 3... P-5f in Diagram 3, he will be at a loss for a continuation after 4. Sx5f. Therefore, although it appears quite slow, white has no better option than 4... P-1d aiming at the king's head. Black, as planned, recommences his counterattack with 5. Nx8e.
It seems that white has too few ideas with 5...P-1e. However, even if white plays 5...P-5f instead, the situation will be unfavorable after 6. Sx5f Nx8e 7. Rx8e N*4d (if 7... Bx9i+, black stands better after 8.P-8c+) 8. S-6g Nx3f 9. B-3i (Diagram E).
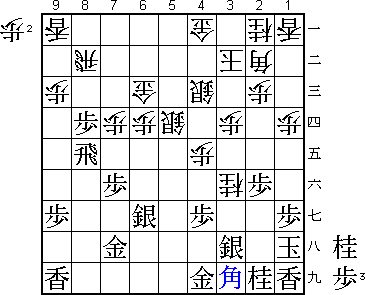 |
Diagram E
After 9. B-3i |
In Diagram E, black's P-8c+ will be very brutal. Even though white defends with ...G-7c, black has N*9e that is an attack by force of numbers. Therefore white can hardly defend in this situation. Moreover, since black can capture a knight with P*3g, his advantage is obvious.
After knights are exchanged, we arrive at Diagram 4.
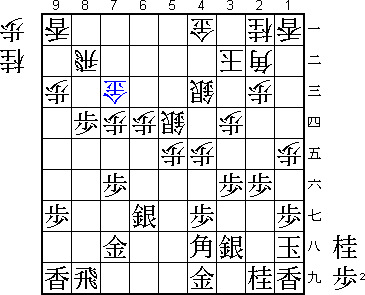 |
Diagram 4
After 6... Gx7c Moves from Diagram 4:
|
The combination 7. P-8c+ and 8. N*9e is a light and clever attacking tesuji. 7. N*8c instead is not to be admired since, if anything, the knight blocks the way of the rook. On the other hand, if simply 7. N*9e, then 7...P-5f 8. P-8c+ P*8h (Diagram F).
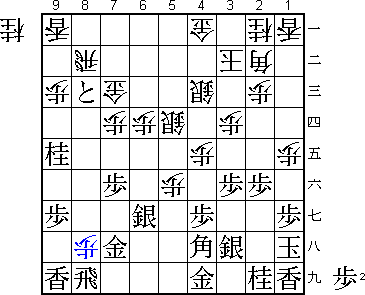 |
Diagram F
After 8... P*8h |
In Diagram F, if rooks are exchanged, 7. N*9e comes to nothing. Therefore, the game would be likely to continue 9. R-5i Gx8c 10. Nx8c+ Rx8c 11. P*8d R-5c (Diagram G).
 |
Diagram G
After 11... R-5c |
In Diagram G, white's power in the center is so strong that black cannot be happy in spite of the exchange of knight for gold. It should be clear that the speedy 7. P-8c+ Gx8c 8. N*9e is a better attack. If 7... Rx8c, black will keep the advantage with 8. Rx8c+ Gx8c 9. R*8a.
In Diagram 5, if white plays 8...P-5f, black will gain a gold and stand far better after 9. Rx8c+ Rx8c 10. Nx8c+ R*8i 11. R*8b (Diagram H).
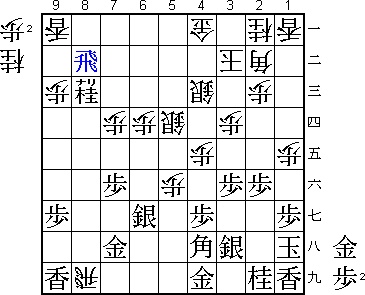 |
Diagram H
After 11. R*8b |
Even if white defends with 8...P*8d in Diagram 5, black strongly exchanges rooks with 9. Nx8c+ Rx8c 10. Rx8d Rx8d 11. Bx8d. The result will be still favorable for him as his king position is stronger than white's.
Black's early escape, 3. K-1h, was in the end splendidly successful.
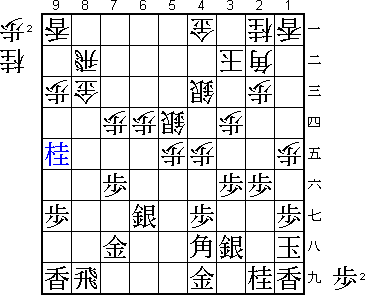 |
Diagram 5
After 8. N*9e |
Translated by Yoshinori Sawada and Patrick Davin
[ Table of Contents | Shogi Nexus Index ]