After P-5e
Moves from Diagram 1:
1... Nx2e
2. Rx2e Rx2e
3. Nx2e R*2a ---> (Diagram 2)
When you attack, the counterattack that steals the initiative is often best. In defence, it is generally the same. The counterstrike that comes just as the opponent starts to move is the most effective.
Let's look at a concrete example.
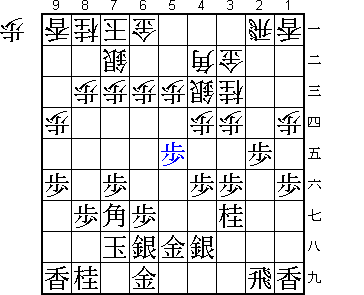
In Diagram 1, against white's Mukaibisha (Opposing Rook), black has chosen a quick attack Ibisha (Static Rook) formation. It is white to move. Black must be on guard against white's possible challenge 1... Nx2e, with the following possibilities:
From black's perspective, both variations could be difficult.
|
Diagram 1
After P-5e Moves from Diagram 1:
|
After 1... Nx2e (Diagram A), how should black defend? He has two options: 2. Nx2e and 2. Rx2e. In this case, the right course is usually to exchange rooks by 2. Rx2e. If instead 2. Nx2e, then after 2... P*2d 3. S4h-5g Px2e 4. S-5f P-2f 5. P-4e P-2g+ (Diagram B), white's attack on the 2-file is too fast and black is worse. 3. S4h-5g and 4. S-5f may appear lax, but without pawn in hand, black has nothing better.
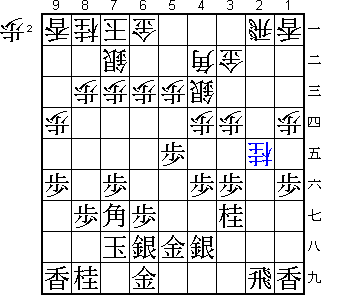 |
Diagram A
After 1... N*2e |
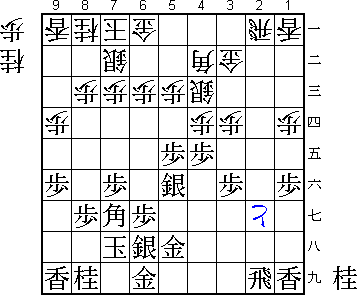 |
Diagram B
After 5... P-2g+ |
After the rook exchange, space is naturally opened for a white rook drop in black territory, and vice versa. This is the reason why black can play 2. Rx2e. 2... Rx2e and 3. Nx2e are forced.
In Diagram 2, white has dropped a rook in his own territory. Common sense normally indicates that rooks are to be dropped in enemy territory. In this case, however, 3... R*2i is met by 4. R*2a (Diagram C), after which white ends up in difficulties.
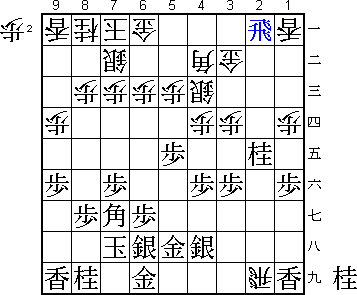 |
Diagram C
After 4. R*2a |
In Diagram C, white is down a knight. If he grabs the lance with 4... Rx1i+, black responds in kind with 5. Rx1a+, and with N-1c+ to follow, black is better. That leaves only 4... P*2d to capture the knight, but then after 5. P-5d Px5d 6. P-4e (if 6... Px4e, 7. Bx1a+), white is worse as he cannot easily spare time to capture the knight.
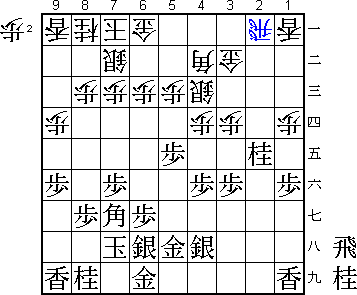 |
Diagram 2
After 3... R*2a Moves from Diagram 2:
|
In Diagram 2, it is very important for white to think beyond the immediate problem of the knight on 2e, and to consider the entire board. Certainly 3...R*2a, which threatens Rx2e while preventing a black rook drop in white territory, is an interesting move that follows the proverb "drop where the opponent wants to drop". If black protects the knight with 4. R*2i, white will play 4... P*2d (Diagram D) and the situation resembles Diagram B. Even after 4. N*3g, instead of 4. R*2i, 4... P*2d is bad for black.
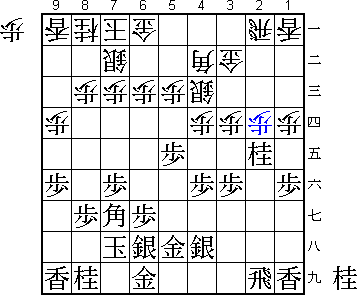 |
Diagram D
After 4... P*2d |
However, if we reflect again on Diagram 2, we will notice that the knight capture on 2e merely restores the material balance. Moreover, while white has already dropped his rook, black still has his in hand. Consider the entire board --- the edge attack, 4. P-9e Px9e 5. Lx9e was born from this idea. Black of course intends R*9b if white plays 6...Lx9e, and a pawn in his hand is a big profit.
4... Rx2e instead of 4... Px9e is also possible, but after 5. Px9d P*9b 6. P-4e Px4e 7. P-5d (Diagram E), white is worse because his king is hemmed in and black threatens Bx1a+. If 6... Rx4e instead of 6... Px4e, white will again be worse after 7. R*2a.
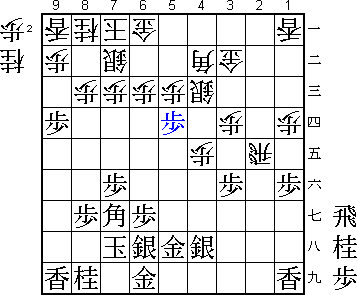 |
Diagram E
After 7. P-5d |
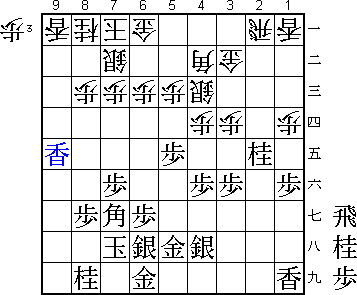 |
Diagram 3
After 5. Lx9e Moves from Diagram 3:
|
When there is no room to drop a rook in the opponent's territory, drawing the enemy lance forward is a practical tesuji. 5. Lx9e is a good example. Accordingly, the calm defensive move 5... P*9c (Diagram F) should also be considered. In this case, black will attack with 6. P-4e Px4e 7. P-5d (Diagram G), aiming at P*4d or P*2b. The situation is unfavorable for white.
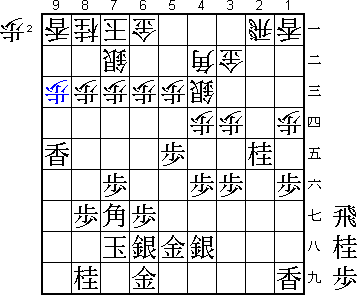 |
Diagram F
After 5... P*9c |
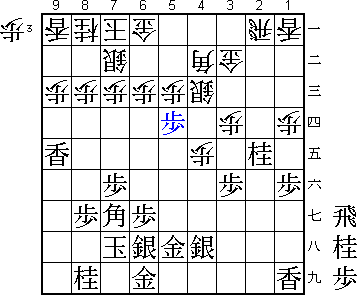 |
Diagram G
After 7. P-5d |
Also if 5...P*9d directly on the lance's head, then 6. Lx9d P*9c 7. Lx9c+ Nx9c 8. P*9d N-8e 9. B-6f (Diagram H). Again white stands worse.
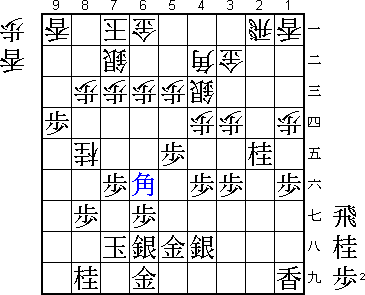 |
Diagram H
After 9. B-6f |
In the preceding variation, if 7... Lx9c instead of 7... Nx9c, white is still worse after 8. P*9d Lx9d 9. P*9e Lx9e 10. R*9b. In any case, when the battle starts near the king as in Diagram H, white cannot escape a disadvantage because black still has power of the rook in hand.
In Diagram 4, white has answered 6. R*9b with 6... P*6c.
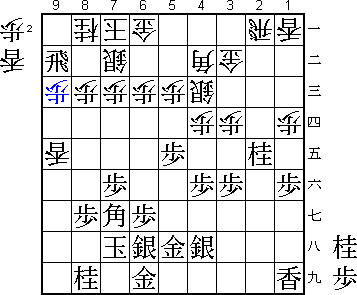 |
Diagram 4
After 6... P*9c Moves from Diagram 4:
|
6... P*9c in Diagram 4 is an unavoidable makeshift. Instead of this move, white would prefer to capture the knight with 6... Rx2e. However, if white allows 7. N*9d (Diagram I), he will soon be lost.
7. Bx9e, capturing the lance, is the correct order of moves.
8. L*8b seems like a very simple-minded attack. Such simple moves are often ridiculed as "vulgar" [zokushu]. In this case, though, the vulgar move is indeed effective. As they used to say, "victory with vulgar moves is the best". There is nothing better than winning by ordinary means. One could say moves like 8. L*8b are vulgar yet strong.
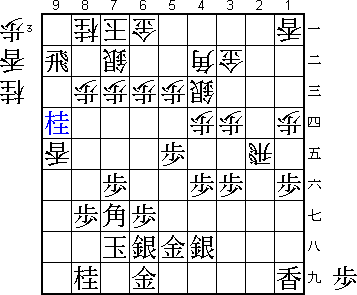 |
Diagram I
After 7. N*9d |
Instead of 8...R-2i+, 8... Rx5e, capturing a pawn and threatening the bishop on 9e can be considered. This, however, fails to black's strong rejoinder 9. B-7g, threatening the rook and stealing back the initiative.
9. R-9a+ is a skillful attacking move, dodging in advance the threat on the rook which occurs after 9. L-8a+ Sx8a.
In Diagram 5, black threatens 10. Lx8a+ Sx8a 11. Bx7c+, while his own king is still safe. Black's advantage is clear.
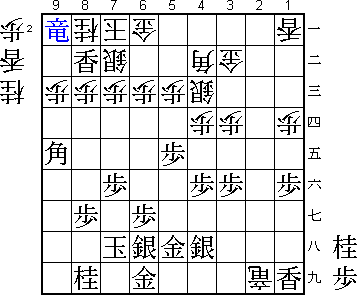 |
Diagram 5
After 9. R-9a+ |
Translated by Yoshinori Sawada and Patrick Davin
[ Table of Contents | Shogi Nexus Index ]