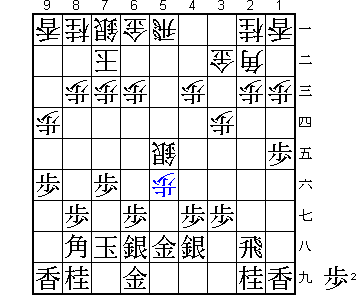
After ... P*5f
Moves from Diagram 1:
1. P*5g Px5g+
2. S4hx5g P*5f
3. S-6f ---> (Diagram 2)
In the first section, we have looked at the basic patterns of defence.
In a practical game the possibilities are so varied that it is often not possible to apply the basic patterns exactly as the have appeared here. If you study and get the knack of the basic patterns, however, you will find frequent chances to apply them.
In the second section, we will examine developments of the basic patterns when applied to practical situations.
In shogi, attack and defence are like two wheels of a cart. It is difficult to win without both. In terms of a shogi move, attack and defence are often two sides of the same coin. The famous shogi master in the last days of the Tokugawa shogunate, Soho Amano, said "The attack is the defence". Even today these are regarded as golden words, and rightly so. If you forget defence in the midst of the attack, or vice versa, then you're not playing real shogi.
We will now examine what is meant by a "defensive counterattack" using as an example a basic Nakabisha (Central Rook) formation.
Diagram 1 shows black's static rook versus white's central rook. White has just dropped the dangling pawn at 5f. White threatens N-3c-4e, so black mustn't dilly-dally. It looks as if black has neither an attack nor a suitable defence against N-3c-4e. In this case, an effective defence can be made by counterattacking the white outpost (silver at 5e and pawn at 5f).
 |
Diagram 1
After ... P*5f Moves from Diagram 1:
|
Black drops a pawn at 5g, the "head" of the enemy pawn. This tesuji is known as "awase-fu". At first glance, the pawn drop results (after 1... Px5g+ 2. S4hx5g P*5f) in a mere loss of time. However, black has a strong move in this position: 3. S-6f, challenging white to exchange silvers.
If white, instead of 2... P*5f, plays 2... S-6b, the situation will favor black, who recaptures the central outpost by 3. S-6f S-6d 4. S6h-5g K-8b 5. S-4f G-7b 6. S-4e G-3c 7. P*5e (Diagram A).
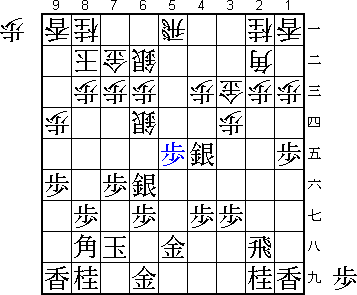 |
Diagram A
After 7. P*5e |
If, in the above variation, white tries 3...Sx6f, black continues 4. Px6f P-7d (Black also stands better after 4... P*5f 5. G-6g S*5g 6. P*5h.) 5. G-6g, threatening S*4e, and black has the easier game (Diagram B).
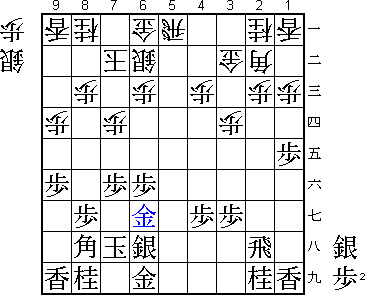 |
Diagram B
After 5. G-6g |
On the other hand if white plays 3... S-4d, then 4. P-4f P-7d 5. G-4g S6b-5c 6. P-3f S-5d 7. N-3g (Diagram C). The position will then be still favorable to black, since he can apply pressure by P-4e.
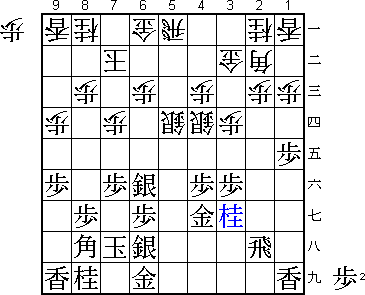 |
Diagram C
After 7. N-3g |
Thus, white has no alternative to 2... P*5f. Diagram 2 shows the situation after black's silver has advanced to 6f.
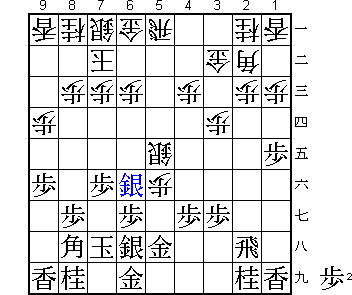 |
Diagram 2
After 3. S-6f Moves from Diagram 2:
|
3. S-6f, challenging white to exchange silvers, seems a little adventurous due to the attack 3... Sx6f 4. Px6f S*5g. What to keep in mind here, though, is the relative strength of the two forces. Black has three generals contesting the central file, versus white's rook and pawn. In shogi, it is important to play strongly where you have a numerical advantage, even if a certain amount of danger is involved. 3. S-6f is a good example of this principle in action.
White naturally accepts black's challenge, exchanging silvers and invading with the silver drop at 5g.
Instead, if white retreats with 3... S-4d, black will repeat the awase-fu: 4. P*5g. Then after 4... Px5g+ 5. S6hx5g P*5f 6. S-4f S-6b 7. P*5e (Diagram D), black has again recaptured the central outpost. Here black is advantageously prepared to meet 7...S-5c with 8. S-4e.
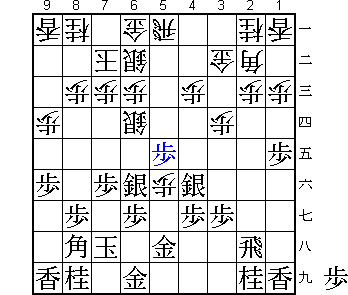 |
Diagram D
After 5. P*5e |
4. P*5g in the above variation is again a good example of defence by counterattack. Black uses the awase-fu tesuji to redeploy both silvers to the critical center.
Returning to 4... S*5g, since 5. Sx5g Px5g+ is out of the question, dodging lightly with 5. G-6g is a good defensive maneuver.
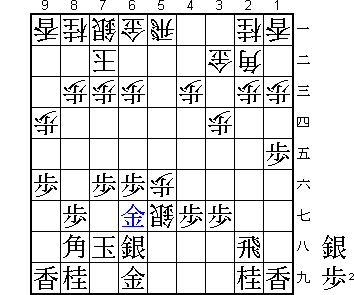 |
Diagram 3
After 5. G-6g Moves from Diagram 3:
|
5. G-6g in Diagram 3 is a clever defence, making way for P*5h while restricting white's attacking options to just one: 7... Sx6h+. I'd like the reader to remember this "dodging defence" when faced with an attack that cannot be met directly. Your results will surely improve along with your skill.
White is forced by circumstances to exchange silvers with 5...Sx6h+ and again drop 6... S*5g. Black defends solidly with 7. P*5h and after 7... Sx6h+ 8. Kx6h, white's attack has suffered a setback. 8. Kx6h is important. The natural-looking 8. Gx6h leads to a tedious defensive situation for black after 9... G*5g (Diagram E).
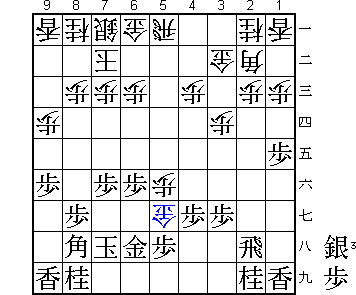 |
Diagram E
After 9... G*6g |
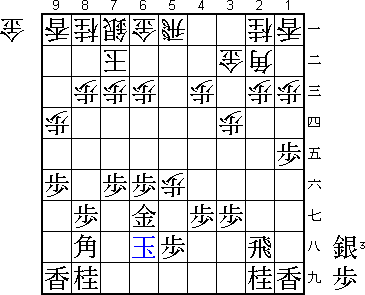 |
Diagram 4
After 8. Kx6h Moves from Diagram 4:
|
In shogi, the situation where an attack has run out of power is called "sashikiri". In Diagram 4, white's attack has been broken. Since the gold drop at 5g bears no fruit after 9. Px5g Px5g+ 10. Gx5g, white may try to correct his formation by 8... S-6b, awaiting another chance to attack. This, however, fails to the counterattack 9. S*4e (Diagram F).
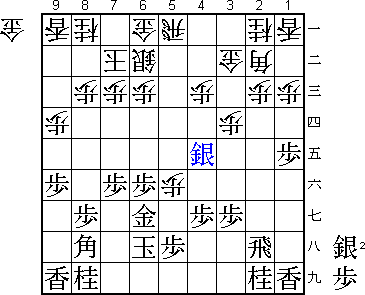 |
Diagram F
After 9. S*4e |
In Diagram F, white cannot allow the pawn at 5f to be captured. He must therefore play 9... G*5e. His disadvantage becomes obvious when black advances Sx3d, aiming next at Sx2c+.
For this reason, white must play 8... G*5e a move earlier, not only to protect the pawn at 5f but also to prevent 9. S*4e. Black answers with the interesting 9. S*4f, continuing the theme of defence by counterattack. Sente's position will be completely safe if he can eliminate the gold at 5e and again threaten S*4e.
White exchanges generals with 9...Gx4f and once again occupies the center with 10...S*5e. This time, however, it is a silver, not a gold, on 5e. Diagram 5 shows the position after black has prevented ...Sx4f with 11. G*4g and then realized his long-sought aim, 12. S*4e.
At diagram 5, black's defence by counterattack has succeeded. He threatens Sx3d, and if white defends with 12... G-3c, black can capture white's precious pawn at 5f with 13. Sx5f. Black's advantage is clear.
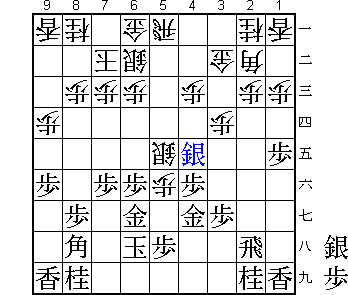 |
Diagram 5
After 12. S*4e |
Translated by Yoshinori Sawada and Patrick Davin
[ Table of Contents | Shogi Nexus Index ]