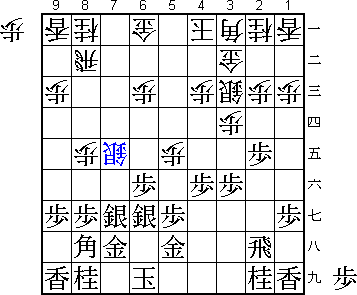
After ... Sx7e
Moves from Diagram 1:
1. P-6e ---> (Diagram 2)
Defence by meeting the attack head-on often occurs in practical play. Here is another example for your reference.
The Yagura complex includes castles such as the Gold Yagura, the Silver Yagura and so on. In Diagram 1, black has formed a Silver Yagura while white has started attacking the bishop's head with ...P-7e, Px7e, ...Sx7e.
Black defends with 4 generals. In this case, as in the previous example, the idea of meeting the opponent's attack head-on springs to mind.
 |
Diagram 1
After ... Sx7e Moves from Diagram 1:
|
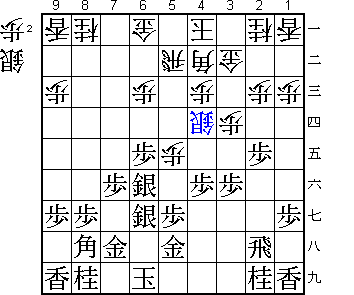 |
Diagram A
After 6... S-4d |
In the preceding variation, 2. Px7e instead of 2. Px8f may be considered. However, after 2... Px8g+ 3. Gx8g Rx8g+ 4. P*8f P*7f 5. S6gx7f G*7h 6. K-5i +Rx7f 7.Sx7f Gx8h (Diagram B), black has a an obvious disadvantage. Already down a silver, black stands to lose the knight and lance as well.
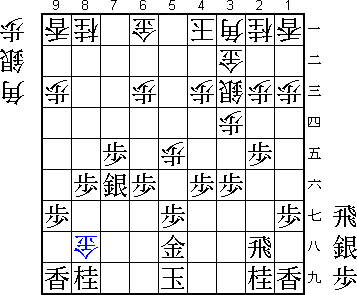 |
Diagram B
After 7... G*8h |
Although 1. P*7f looks like a solid defence, it is actually exactly what white is hoping for. After this move, it is no wonder white gets the upper hand.
Another idea is to redeploy the bishop with 1. B-7i. If white replies 1... P-8f, black can solidify his position by 2. Px8f Sx8f 3.Sx8f Bx8f 4. P*8g B-4b 5. B-6h (Diagram C). In Diagram C, black has a satisfactory game.
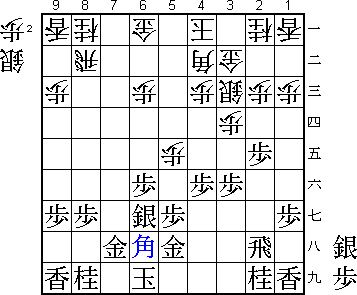 |
Diagram C
After 5. B-6h |
After 1. B-7i, instead of exchanging with 1... P-8f, white will attack as follows: 1... P-9d 2. B-6h P-9e 3. B-5i P-8f 4. Px8f Sx8f 5. Sx8f Bx8f 6. Bx8f Rx8f 7. P*8g R-8b 8. B*5c P-5f 9. B-2f+ P-9f 10. Px9f P*9g 11. Lx9g S*9h (Diagram D). Black's position is invaded from the 9th file.
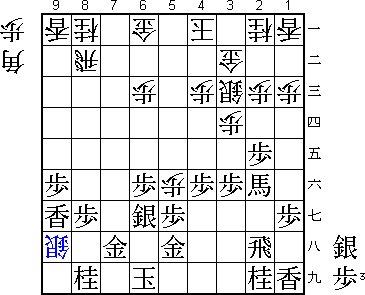 |
Diagram D
After 11... S*9h |
In the preceding, if black plays 9. Px5f instead of 9. B-2f+, he loses after 9...P*5g 10. Gx5g B*3i 11. R-5h S*4i 12. R-5i B-4h+ (Diagram E). If 10. G-4h, 10... S*3i, and if 10. G5h-6h, 10... S*4g. In any case, black is worse. Try to master the attacking method after white's 9... P*5g. It is a tesuji that often occurs in actual games.
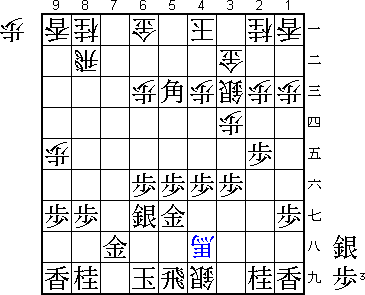 |
Diagram E
After 12... B-4h+ |
On the other hand, if black tries 9. Sx5f, then 9... P*7g 10. Nx7g (If 10. Gx7g, 10... B*8h is terrible for black) P*7f 11. N-6e P-7g+ 12. Gx7g B*8h (Diagram F). Black's disadvantage is again obvious.
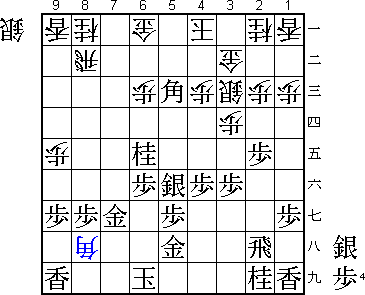 |
Diagram F
After 12... B*8h |
Redeploying the bishop to 6h via 7i results in a big loss of time when the
bishops are exchanged. As we can now see, meeting the white's attack head-on
by pushing the pawn to 6e is black's best countermeasure.
A Tesuji that Should be Learned, but...
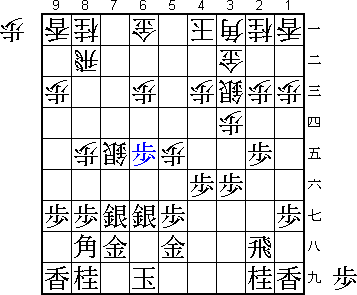 |
Diagram 2
After 1. P-6e Moves from Diagram 2:
|
1... P-8f is white's planned thrust. If he falters here, his attack becomes insignificant. For example, if white plays 1... P*7f 2. S6gx7f Sx7f 3. Sx7f P-8f 4. Px8f Rx8f 5. S*8g R-8d 6. Bx5e P*7c 7. B-6f (Diagram G), he winds up with no pawns in hand, having forced black into an ideal formation.
 |
Diagram G
After 7. B-6f |
1... P*7f does have the aim of breaking up black's formation, but the impact of the pawn loss is large enough that the attack fails. Generally, is is best to avoid loss of material.
After 1... P-8f, instead of 2. Px8f, black can play 2. Sx8f with the idea 2... Sx8f 3. Bx5e. In this case, however, black loses the initiative after 3... P*7c 4. Px8f S-4d (Diagram H).
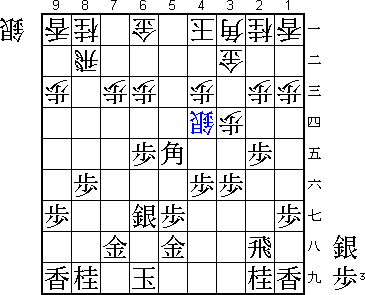 |
Diagram H
After 4... S-4d |
Instead of 2... Sx8f, the attacking tesuji 2... P*8g may naturally be considered. Here, however, white loses after 3. Gx8g Sx8f 4. Sx8f Bx8f 5. P*8e Rx8e 6. S-7f R-8b 7. Bx5e (Diagram I).
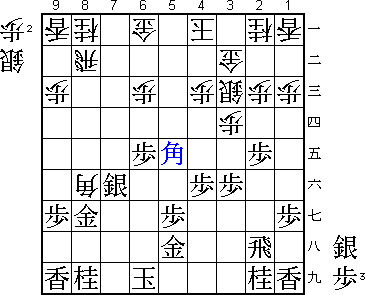 |
Diagram I
After 7. Bx5e |
In the preceding variation, if 5. Gx8f Rx8f, white's rook will promote and the position will be troublesome for black. On the other hand, the immediate 5. Bx5e, omitting 5. P*8e, allows 5... B-5i+ 6. Kx5i Rx8g+ (Diagram J), and again, though the position is not necessarily bad for black, the promoted rook at 8g is annoying. Such annoyances are best avoided.
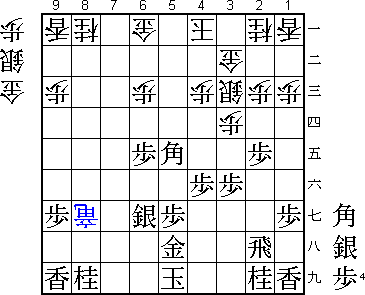 |
Diagram J
After 6... Rx8g+ |
2... P*8g is a tesuji to be aware of, but in this case, it fails since black's formation is too solid.
4... R-8d is the best retreat. If the rook goes all the way back 4... R-8b, white plays 5. Bx5e P*7c 6. P*7d (Diagram K). In Diagram K, white has no good defence. The capture of P5e is inevitable, but allowing the rook to be attacked at the same time will naturally be doubly disadvantageous. We must avoid allowing a capture to simultaneously attack a second piece.
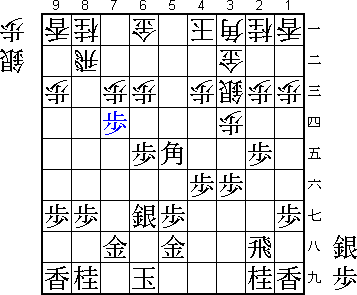 |
Diagram K
After 6. P*7d |
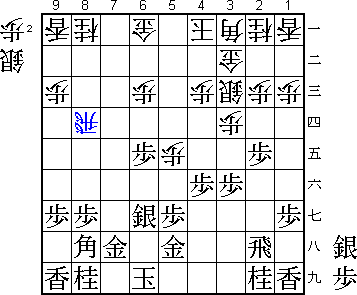 |
Diagram 3
After 4... R-8d Moves from Diagram 3:
|
Black's 5. Bx5e captures a pawn and attacks the lance on 9a. Rarely can we play such a juicy move. This counterattack was the reason for black's 1. P-6e in Diagram 1. White proceded to fall into the trap, but once he started to attack with Sx7e, this result is unavoidable. As you can see from this example, you must be especially careful when launching an offensive. 5... P*7c is a bitter pill, but there is no better way to prevent black's B-9a+. 5... P-6d instead gives black a good attacking formation after 6. S*7e R-8e 7. S-7f (Diagram L).
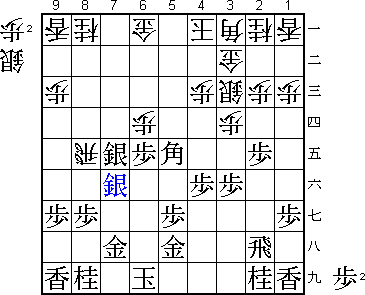 |
Diagram L
After 7. S-7f |
5...P*8b, on the other hand, cuts off the rook's retreat and puts and end to white's 8th file attack. This defensive move is out of question.
6. S-7f is good move, intending S*7e or B-6f. Instead of 6. S-7f, you may want to play 6. B-6f to threaten the rook. However, this idea backfires after 6... S*7e 7. B-5e S-4d 8. B-8h P*8f (Diagram M).
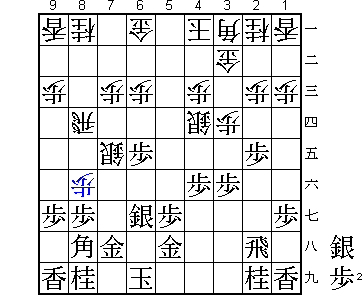 |
Diagram M
After 8... P*8f |
"Do not jump at a move that seems too good". Please keep this phrase in mind at all times.
In Diagram 4, white has nothing to show for the loss of a pawn. His attack is entirely shut out. Black's defensive strategy of meeting the attack head-on has been a complete success.
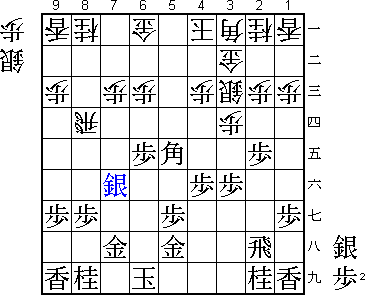 |
Diagram 4
After 6. S-7f |
Translated by Yoshinori Sawada and Patrick Davin
[ Table of Contents | Shogi Nexus Index ]