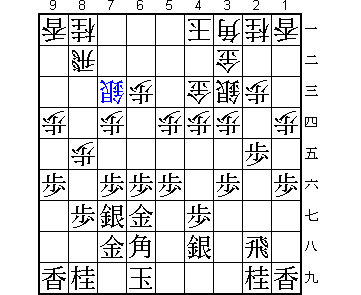
After ... S-7c
Moves from Diagram 1:
1. S-5g P-7e
2. Px7e Bx7e
3. P-6e ---> (Diagram 2)
There is more than one type of counterattacking defence.  When your
opponent attacks, you may gain pieces in hand that can then be turned
around and used to attack the opponent's weaknesses.  This is one type
of counterattack.

Or, by directly facing the energy of the attack, you may make a material
profit or drive away the attack.  This is another powerful type of
counterattack.  Here we will examine the second of these basic patterns.

Diagram 1 shows a position from the Yagura, an opening which has long
been the most often-used in shogi.  It is a lamentable fact of life that
in symmetrical positions, both sides are rather apt to run out of useful
moves, beckoning "sennichite" (perpetual repetition).

White has just advanced the silver to 7c, preparing to break the symmetry
and take the initiative with the pawn exchange P-7e.  Let us try and find
the best way for black to counteract the attack.
 |
Diagram 1
After ... S-7c Moves from Diagram 1:
|
In Diagram 1, black can prevent ...P-7e by playing 1. B-4f.

If after 1. B-4f, white persists with 1... P-7e, then 2. Px7e Bx7e 3. P*7d
S-6d 4. P-6e (Diagram A) gives black a won game.
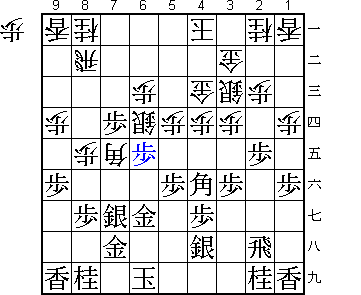 |
Diagram A
After 4. P-6e |
However, shogi is not such an easy game.  And 1... P-7e in spite of 1. B-4f
makes white's move ...S-7c entirely meaningless.

When your opponent launches an attack, you must assume he does so with
a fair amount of confidence.  Your mental attitudes and habits can be the
cause of both good and bad moves.

To be specific, in response to 1. B-4f, white will play 1... P-4e 2. B-3g
G-4d (Diagram B), putting pressure on the bishop.  Black will be pushed
back.
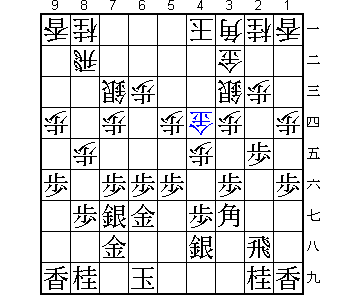 |
Diagram B
After 2... G-4d |
The kind of failure in Diagram B is possible if you are too concerned with
the opponent's direct aims.

Thinking solely of preventing P-7e, black played a move with no future
potential ("aji").

A positive spirit, allowing white to push the pawn to 7e, with the idea
of "riding the attack", will be good for your game.  With this in mind,
1. S-5g, bolstering the center and preparing to intercept P-7e, is the way
to play this position.

1... P-7e is the logical followup to ... S-7c.  The appealing 1... B-6d
instead backfires after 2. P-4f P-4e 3. P-6e (Diagram C).  Again, a
shortsighted attempt will not do.
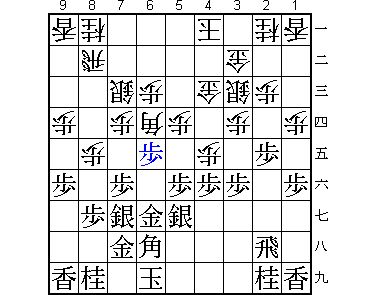 |
Diagram C
After 3. P-6e |
2. Px7e is the most natural move.  Allowing ...Px7f would leave a weakness
in front of black's king, and give white attacking chances.

Beginners are often unduly frightened when the opponent initiates a pawn
exchange, and somehow feel that they shouldn't capture.

However, a simple one-for-one exchange is rarely something to be feared.

So do not be afraid of your own shadow, and exchange pawns without
hesitation.

3. P-6e in response to 2... Bx7e, is the aim behind 1. S-5g.  With this
pawn push, black's four generals become one unit moving forward in
counterattack.

If black tamely plays 3. P*7f, white builds an excellent formation with
3... B-6d 4. P-4f S-7d (Diagram D) and black will remain at least one
step behind.
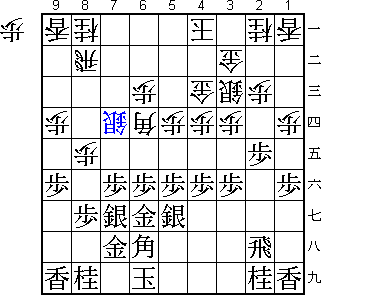 |
Diagram D
After 4... S-7d |
3. S-7f may also be considered, but after 3... B-6d 4. P-4f P-7e 5. S-6e
B-4b 6. P*7d S-8d (Diagram E), black is lost due to the threat of ...P-6d.
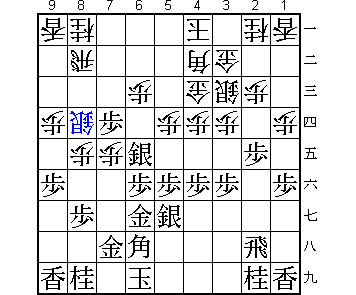 |
Diagram E
After 6... S-8d |
In any case, 1. S-5g can not come to life without 3. P-6e.

Let me repeat that a move must be allowed to achieve its aim in the same
way as a flower is allowed to bloom.
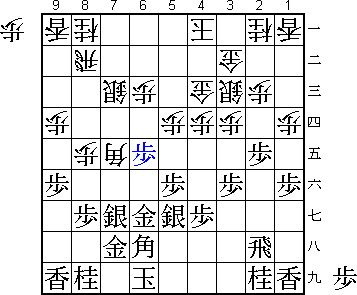 |
Diagram 2
After 3. P-6e Moves from Diagram 2:
|
With 3... B-8d, white plans the formation ...S-7d and ...N-7c, aiming
to launch an all-out attack with ...P-6e.

This is a standard method of demolishing the Fortress.

Instead 3... B-4b, aiming at an attack along the 9-file, loses to the
forceful counterattack: 4. S5g-6f S-8d 5. B-4f P*7c 6. P*7d (Diagram F).
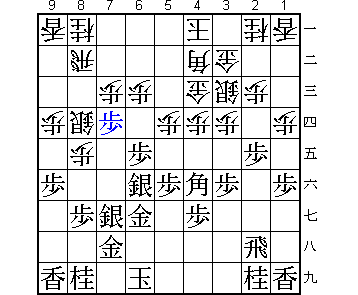 |
Diagram F
After 6. P*7d |
You must not allow the opponent to make good counter-use of your attack.
3... B-4b has no intensity.

When your attack lacks intensity, it will not easily succeed.

4. S5g-6f, the followup to 1. S-5g, is absolutely required in order to
prevent white from building his attacking formation.  4. S5g-6f prepares
a very strong hidden countermeasure.

4... S-7d is the natural way to build the attacking formation white is
aiming at.  If white omits 4... S-7d, black would pressurize with 5. S-7f,
threatening to take on 8e.  After 3 ...B-8d, 4... S-7d becomes absolutely
essential.

The counterattacking move 5. B-4f could be called black's "trump card".
Also possible is 5. B-5g planning 6. P*7e, though this is less effective
after 5... R-7b (Diagram G).

5. B-4f is clearly more intense.
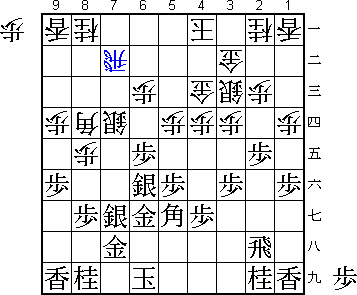 |
Diagram G
After 5... R-7b |
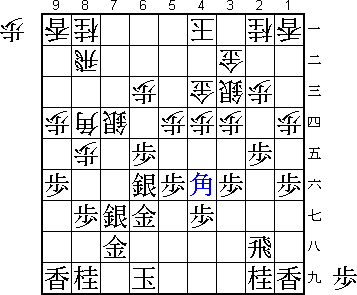 |
Diagram 3
After 5. B-4f Moves from Diagram 3:
|
White's rook is attacked and must be defended.  The first move that
comes to mind is 5... R-9b, which however loses after 6. P*7e Sx7e
7. Sx7e Bx7e 8. S-6f B-8d 9. S*8c (Diagram H).
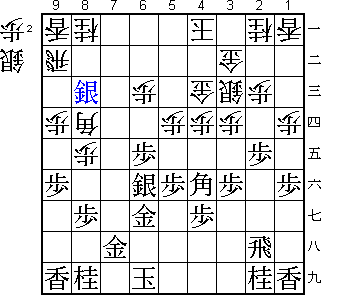 |
Diagram H
After 9. S*8c |
If white tries 6... S-8c instead of 6... Sx7e in the above variation,
he will be completely confined after 7. S-7f.

White's rook, bishop, and silver have forgotten their attacking purpose.

Another thing I would like you to notice in this variation is the
clever-looking 6. P*7b in place of 6. P*7e.  Intermediate players like
to play such stylish moves, but here 6... B-6b (Diagram I) leaves black
will no attacking continuation.  6. P*7b is an overplay.
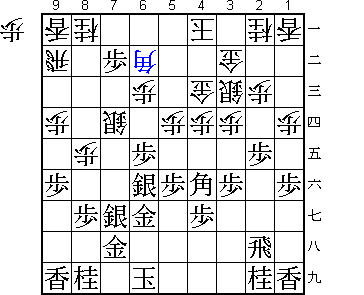 |
Diagram I
After 6... B-6b |
P*7b is an oft-occuring tesuji (tactic) and should be remembered.  In this
position, however, 6. P*7b  is a bit too clever and doesn't work.

Instead of 5... R-9b, 5... P*7c is another defensive possibility, though
after 6. S-7f K-3a 7. P*7e S-8c 8. S-8e (Diagram J), white again has
a poor game.
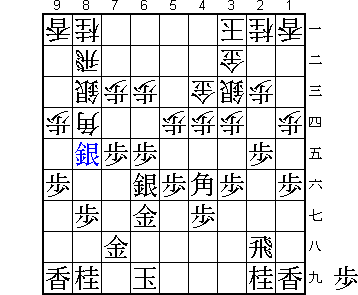 |
Diagram J
After 8. Sx8e |
Another move that can naturally be considered is 5... B-7c, offering to
exchange bishops.  Here again white gets the worst of it after 6. Bx7c
Nx7c 7. B*3g.

Note that in the above, black would like to drop 7. P*7e instead of
7. B*3g.  Unfortunately, this falls into a trap: 7... Sx7e 8. Sx7e
B*3i (Diagram K).  Black must be careful.
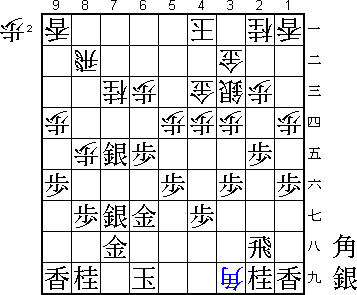 |
Diagram K
After 8... B*3i |
White's 5... N-7c, persistently aiming at the 6-file, is the way to utilize
the bishop at 8d.

6. P*7e is a strong move, that smashes white's plan and making decisive use
of the bishop at 4f.  In response, 6... S-8c looks weak but is forced.

If white bravely continues 6... Sx7e, he will lose after 7. Sx7e Bx7e 8.
Bx7c+ B-3i+ 9. +Bx8b +Bx2h 10. +Bx2h (Diagram L).
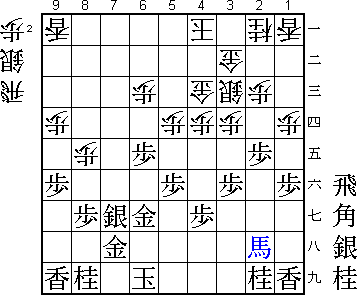 |
Diagram L
After 10. +Bx2h |
6... Sx6e presents no problem due to 7. Sx6e Nx6e 8. Bx8b+.

With 7. S-7f, black has succeeded in building a good position and
threatens to win the game with 8. Sx8e.
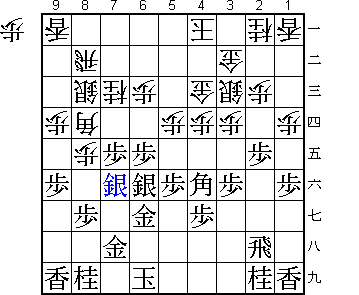 |
Diagram 4
After 7. S-7f Moves from Diagram 4:
|
If black is able to play S-8e, white will obviously lose the game.
7... R-8a is unavoidable.

Instead, 7... R-7b is not good placement, because when the knight at
7c moves, black will have Bx9a+.  8a is clearly a better spot for the
rook.

7... S-7b, trying to correct the bad position of the silver, loses
immediately to 8. P-7d (Diagram M).  Please take careful note, as this
is easy to overlook.
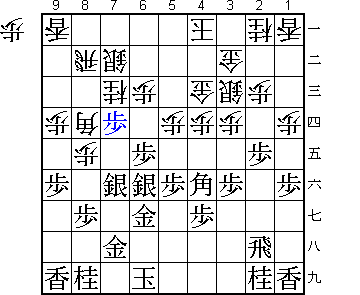 |
Diagram M
After 8. P-7d |
Black completes his perfect formation with 8. N-7g.

If black can play 9. Nx8e, besides winning a pawn for nothing, he will
double the power of his bishop.

White has no defence.  Though it's painful, there is no alternative to
8... P*7b, preparing against black's attack by defending the knight.

However, after 9. Nx8e, white is a pawn down and has no pawns in hand.
On top of that, the position of the silver on 8c is bad.  Black's
defensive strategy, meeting the attack head-on and repelling it, has
been a complete success.
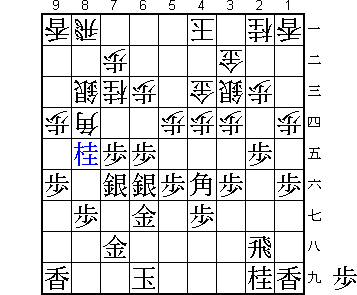 |
Diagram 5
After 9. Nx8e |
Translated by Yoshinori Sawada and Patrick Davin
[ Table of Contents | Shogi Nexus Index ]