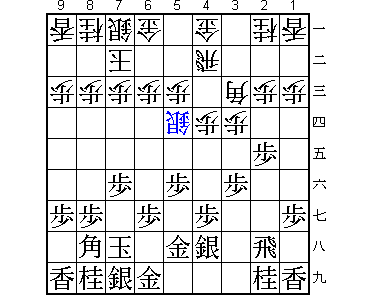
After ... S-5d
Moves from Diagram 1:
1. P-5e S-6e ---> (Diagram 2)
One advanced defensive idea is to allow your opponent to attack while
at the same time preparing for your counterattack.  You can move
forward after nipping his attack in the bud, but if the opponent
insists on forcing his attack you can take advantage of his
unreasonable attempt.  Although this is a high level technique, you
cannot say that you are a mature player on defence without reaching
this stage.  If you can be happy inviting your opponent to try a
premature attack then you are an accomplished player.

Now let me begin the next lesson.  At Diagram 1, white has played the
shikenbisha, or 4th file rook opening, and moved a silver to 5d aiming
for a quick attack.  He threatens black's two pawns at 5f and 7f with
S-6e.
|
Diagram 1
After ... S-5d Moves from Diagram 1:
|
Many players are afraid of a move like white's S-6e so they try to
prevent it at all costs and do not consider any other plan.  In fact,
leading you to such a state of mind is white's aim.  It is as if he
narrows the swimming birds.  If black prevents ...S-6e with 1. P-6f he
blocks his own bishop.  White, unconstrained, succeeds in building a
powerful formation by pushing his pawn to 4e (Diagram A).  If the
position of Diagram A comes true, it can be said that white is leading
the game.
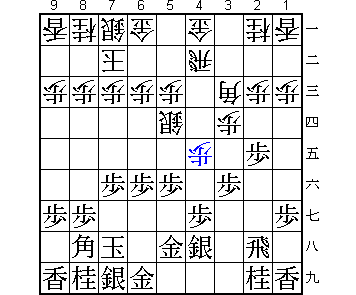 |
Diagram A
After 1... P-4e |
Black must not play 1. P-6f seeking safety.  This is an example of a
passive move.  Therefore black may want to move at diagram 1, 1.S-6h
and allow 1...S-6e.  However, after 1...S-6e 2.S-7g Sx5f (Diagram B),
black has lost a pawn and white's rook on the 4th file will soon
become active.
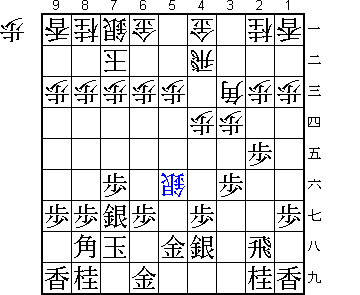 |
Diagram B
After 2... Sx5f |
You should play to contain the opponent's bishop as much as possible
against a strategy like the 4th file rook, but it is impossible to do
that at Diagram B.  On the other hand, the variation from Diagram 1:
1.S-6h S-6e 2.P-5e Sx7f 3.R-2f aiming for P-3e next, can be
considered.  However, the silver escapes with 3...S-6e, so that black
still loses a pawn and the position at Diagram C is unfavorable for
black.
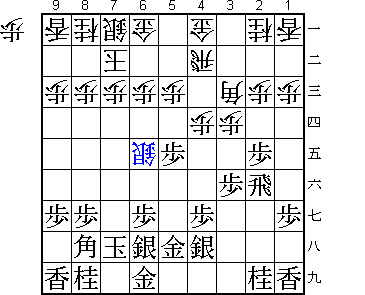 |
Diagram C
After 3... S-6e |
Timing is very important for a successful counterattack.  If the
counterattack is out of tune like Diagram C, you may lose your balance
and fall flat on your face.  After 1...S-6e, it may be time for black
to manfully play: 2.P-3e Px3e 3.R-3h, and counterattack.  Black's
tactics are successful if white blindly plays 3...Sx7f because the
silver has no retreat after 4.Rx3e (Diagram D).
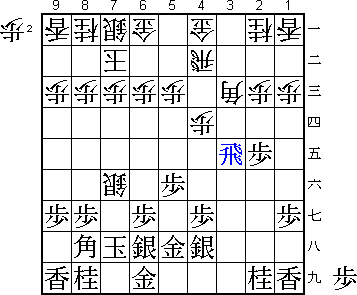 |
Diagram D
After 4. Rx3e |
On the other hand, if white answers 3.R-3h with 3...P-4e without
capturing a pawn at 7f black plays 4.Bx3c+ Nx3c 5.S-7g (Diagram E).
Black solidifies his position and plans Rx3e next.  Black will
gradually gain the advantage.
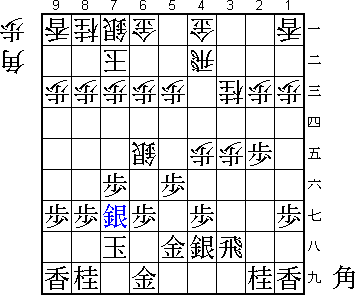 |
Diagram E
After 5. S-7g |
However, because white is also trying to win, he never plays as black
wishes so easily.  When black plays 3.R-3h, white plays: 3...Sx5f
4.Rx3e S-4e (Diagram F).  At Diagram F, black is not very bad, but for
beginners, playing the black side is more difficult.
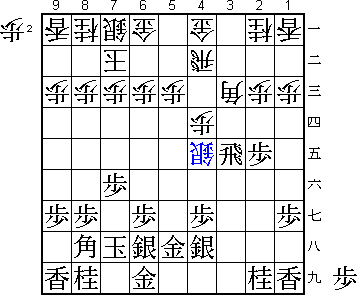 |
Diagram F
After 4... S-4e |
As a result of this analysis, it is clear that black's 1.S-6h is
caught in white's tactics.  Neither is 1.S-5g good, instead of 1.S-6h,
because black's formation is decided too early.  On 1.S-5g, white
still plays 1...S-6e.  Then if black tries to escape with 2.P-7e
(Diagram G), he creates a big hole at the head of his king.  It is
difficult to correct black's weakened position and white is apt to
target that weakness.  Be careful not to make a disordered formation,
otherwise you will lose many games.
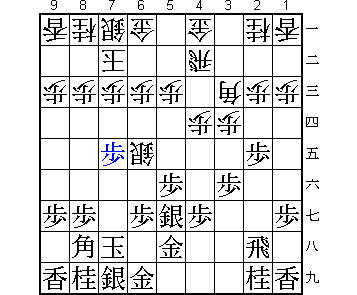 |
Diagram G
After 2. P-7e |
In consideration of these variations, at Diagram 1 black does better
to force white to play 1...S-6e and after that, consider the
counterattack.  The only move for this is 1.P-5e.  This is a good
example of a strong defence by tempting the opponent to attack.
White's S-6e is forced, but that is what white wanted to play anyway!
If white plays 1...S-4e instead of 1...S-6e, he will obviously stand
poorly because of the variation: 2.R-2f B-1e 3.R-1f P-1d 4.N-3g S-5f
5.P-3e.  White's planned play is, of course, S-6e not S-4e.  White's
S-6e, needless to say, aims at capturing the pawn at 7f.  Black's play
after this is difficult.
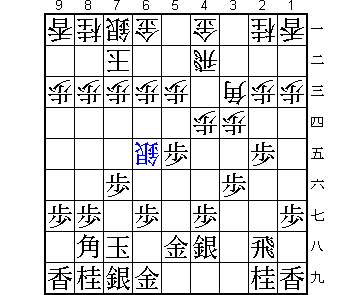 |
Diagram 2
After 1... S-6e Moves from Diagram 2:
|
Black's pawn at 7f is lost.  If black desperately plays 2.K-7g to
defend it, he will lose the game.  White plays: 2...P-4e 3.P-6f Bx5e
(Diagram H).
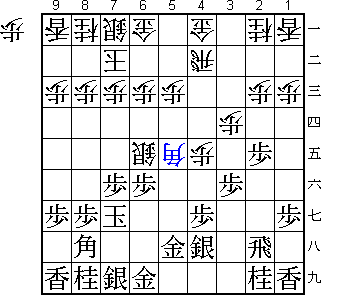 |
Diagram H
After 3... B-5e |
To save the pawn 2.P-7e may be considered, but black's position will
be precarious because white can activate his rook with the variation:
2...P-4e 3.R-2f P-4f (Diagram I).
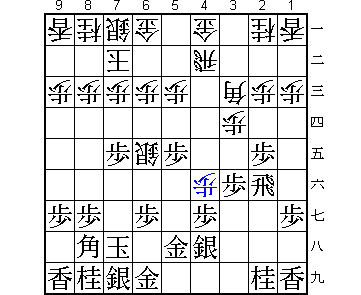 |
Diagram I
After 3... P-4f |
Black pushed his pawn to 5e aware that his pawn at 7f would be
captured, so preventing its capture now conflicts with his initial
policy.  "If you want the pawn, then take it!"  One good move for
black is 2.R-2f utilizing his rook horizontally on the f-rank.
Another potent countermeasure is for black to move 2.G-5g first,
instead of R-2f, and if white plays 2...Sx7f then 3.G-6f (Diagram J).
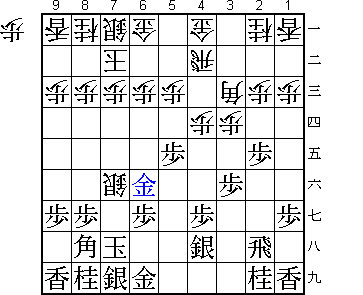 |
Diagram J
After 3. G-6f |
However, since this disorders black's formation somewhat, an amateur
is likely to make an irrecoverable mistake later because he is not
extremely strong.  It is wise to avoid complicated positions early in
your career because even if you play one or two good moves it is very
difficult to let them bear fruit.
White's 2...P-4e is a natural move that utilizes his rook and bishop.
If white gets greedy and plays 2...Sx7f instead, he will suffer total
defeat when black plays: 3.P-3e S-6e 4.Px3d B-2b 5.P-2d (Diagram K).
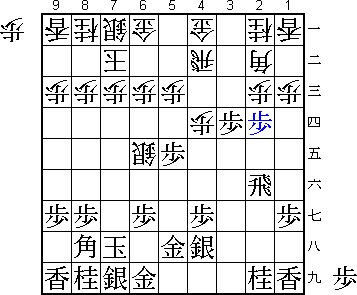 |
Diagram K
After 5. P-2d |
With 2.R-2f, black allows white to capture the pawn at 7f while the
aim of his counterattack is well hidden.  In this case, white cannot
hope to oppose black's tactics without activating his rook.  After
3.P-3e the attack flows naturally because black's rook is powerfully
activated by this move.  If black is slow and allows white to play
2...P-4e, white's rook is activated first despite the fact that white
moved second.  However, 3.P-3e is a bold move one can hardly play
without prior study because it seems that a pawn will be lost with
one's eyes wide open.  I would like the readers to understand well
that pushing and abandoning a pawn is often a good move no matter
whether you are defending or attacking.  Furthermore, a pawn is a
piece that works better by being sacrificed.
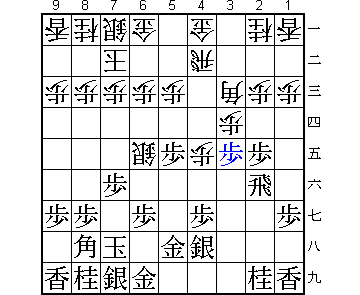 |
Diagram 3
After 3. P-3e Moves from Diagram 3:
|
3...Px3e is a natural move because it is trouble for white to allow
his pawn at 3d to be captured.  At first glance, white's 3...B-4d
looks splendid, but after the variation: 4.P-2d Bx3e 5.R-2h Bx2d
6.P-5d (Diagram L).  Black secures the advantage because of his twin
threats Px5c+ and Bx1a+.  3...B-4d was seemingly a great idea, but
that was all. Such a move will frequently catch your attention.
 |
Diagram L
After 6. P-5d |
Another try, 3...R-4d, looks the other way.  However, it fails after
4.P-7e Px3e.  Now white's silver is caught and will be captured after
5.N-7g (Diagram M).
 |
Diagram M
After 5. N-7g |
In this variation, 4.P-5d looks attractive, but he will fall into
white's trap with the variation: 4...Sx5d  5.Bx4d  Bx4d  6.S-8h  B*5e
(Diagram N).  As you gain experience, but before you become strong,
you are likely to make such a mistake. Be careful.
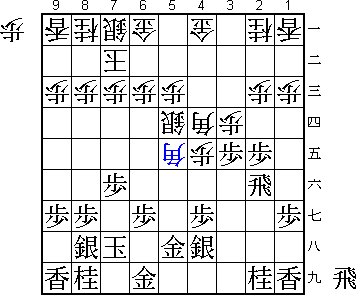 |
Diagram N
After 6... B*5e |
Instead of 3...P-3e, 3...B-1e may attract his eyes, but then he will
stand worse after the variation: 4.R-1f  P-1d  5.P-5d.  He should be
obedient and respond to 3.P-3e with ...Px3e, and wait and see what
black is going to do.  Black's  4.P-7e is the final point of 2.R-2f.
If black simply plays 4.N-7g without 4.P-7e, white's silver escapes to
7d, then black is obviously losing because he has already lost a pawn
and, moreover, white is aiming at Bx5e (Diagram O).
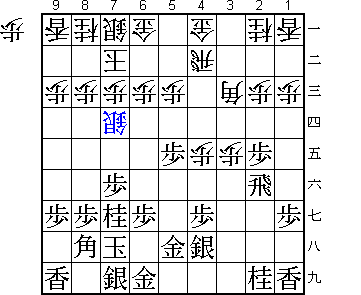 |
Diagram O
After 4... S-7d |
By pushing the pawn to 7e, black's 2.R-2f entirely bore fruit.  A move
played with a certain purpose is always rewarded by a series of moves
after that.  At Diagram 5, white's quick attack is completely
repulsed.
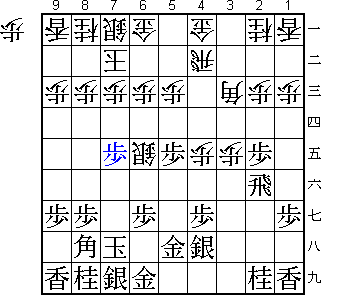 |
Diagram 4
After 4. P-7e Moves from Diagram 4:
|
If black has time to move his knight to 7g, the silver at 6e will be
trapped.  White must try to secure a safe square for the silver's
escape.  The only way for that is 4...P-4f stopping the rook's
horizontal threat.  Black's 5.P-2d in response is a well timed move.
By letting white capture the pawn at 2d, white's attack by B-1e is
blocked beforehand, and depending on how things go, black's rook can
dash out to 2d.  Once a keen battle starts, white may attack without
capturing the pawn, however, this is the best time to push the pawn at
2e.  If black simply respond to 4...P-4f by 5.Px4f instead of 5.P-2d,
he will stand worse as white attacks strongly with the variation:
5...R-4d 6.P-4e Rx4e 7.N-7g B-1e 8.R-1f Bx4h+ (Diagram P).  Black's
P-2d is called a tesuji or standard tactical move that I want you to
learn.
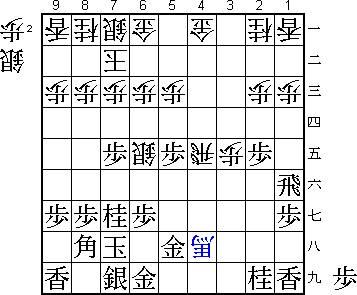 |
Diagram P
After 8... Bx4h+ |
White's 5...Px2d is forced.  His 5...Px4g+ is not good because it
activates black's silver at 4h, and if 5...Bx2d, then 6.P-5d is
crushing (Diagram Q).
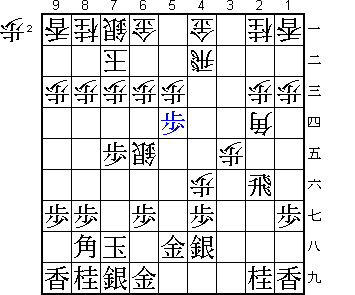 |
Diagram Q
After 6. P-5d |
Black, after 5...Px2d, should calmly play 6.Px4f.  This captured pawn
will soon come in handy to attack the head of the bishop by P*3d.
White's 6...R-4d is another forced move to prevent 7.P*3d.  White may
want to let his silver at 6e slip to 5f, but he will be overrun by:
7.P*3d B-2b 8.Rx2d G-3b 9.P*2c (Diagram R).  Since 10.P-5d is severe,
black has a decisive advantage.
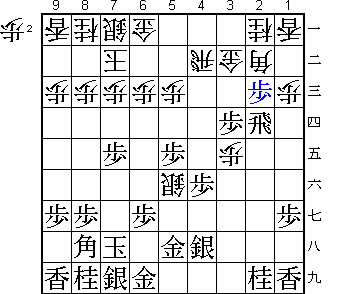 |
Diagram R
After 9. P*2c |
If 6...S-7f instead of 6...S-5f, it is the same.  The only move white
can play is, after all, 6...R-4d to prevent 7.P*3d.  However black
should not relax after forcing white's play.  He may think that
6...R-4d is simply to defend against 7.P*3d.  However, the move also
aims at an attack, 7...R-3d and 8...P-3f or, if black is idle,
7...S-7f and 8...R-8d which can beat black very quickly.  Therefore
the best move for black is to promptly push the pawn to 4e,
threatening white's rook.  Now black has seized upon the weak point of
6...R-4d.  It is very important to play at the drop of a hat with
confidence after your own analysis.  Instead of 7.P-4e, black may be
intrigued by 7.P-5d, but there is nothing commendable about the
position which arises after 7...Rx5d 8.Bx3c+ Nx3c 9.B*4c R-6d
(Diagram S).
 |
Diagram S
After 9... R-6d |
7.P-4e is the critical move.  Again, white's reply, 7...Rx4e, is
forced because if the rook escapes elsewhere, white's silver at 6e
will be trapped by 8.N-7g.  Now, black has fulfilled his purpose by
8.N-7g, because he can win the silver at 6e.  It must be said that the
quick attack white planned was a total failure after the silver was
captured.
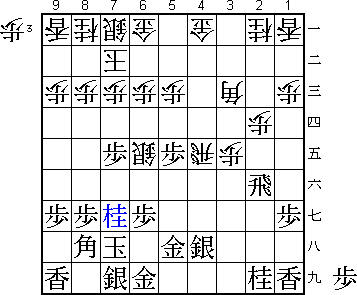 |
Diagram 5
After 8. N-7g |
Translated by Yoshinori Sawada and Randy Andrews
[ Table of Contents | Shogi Nexus Index ]