After ... P*5f
Moves from Diagram 1:
1. P*5g Px5g+
2. S4hx5g P*5f ---> (Diagram 2)
Breaking an opponent's outpost is another method of effective defence.
In this case, an equal number of defensive pieces must confront the
attacking side.  It is not significant if you lose these pieces as
long as the outpost is broken.  By breaking the outpost, you regain
your balance to mount a counterattack.  Now, I would like to explain
how to do this with an example.
|
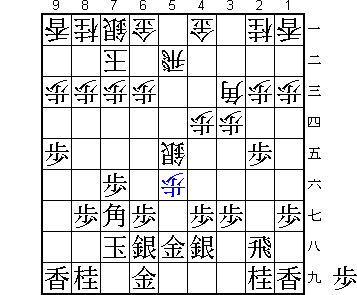
Diagram 1
After ... P*5f Moves from Diagram 1:
|
In Diagram 1, white has disclosed his plan of cramping black by
occupying the 5-file with the Nakabisha or Central Rook Opening.  If
left alone, he will easily achieve his objective.  Black must, at any
cost, eliminate white's outpost on the 5-file.
1. P*5g is a courageous move.  No one can play without learning it
beforehand.  It is like offering your head under a raised fist.  Black
will never eliminate white's strong point if he allows 1... P-4e.  If
you stand idle, you will be beaten, but if you can break your
opponent's arms, you will never be beaten.  1. P*5g contains this
aggressive spirit, though it's very hard to play without bravery.

1... Px5g+ followed by 2... P*5f is the natural way to maintain the
forward base.

To strengthen his offensive, white can also consider 1... P-4e.
This is ineffective, however, after 2. Px5f Sx5f 3. P-6f P*5g 4.
S4hx5g Sx5g+ 5. Sx5g (Diagram A).  White is out of pawns and black
threatens S*4c.
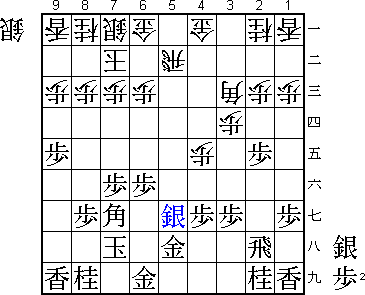 |
Diagram A
After 5. Sx5g |
In the above line, 3. Bx3c+ Nx3c 4. P*5g S-6e 5. S-7g (Diagram B) is
also good.  Black threatens B*4c and P-2d.  In either case, black
stands better if he eliminates the outpost at 5f.
 |
Diagram B
After 5. S-7g |
2. S4hx5g is the natural way to capture the white pawn at 5g.  If 2.
S6hx5g, the defence on the 5-file will fail after 2... P*5f 3. S-6f
Sx6f 4. Px6f S*5g (Diagram C).  If 2. Gx5g P*5f and the gold must
return to 5h.  2. Gx5g reveals poor understanding.
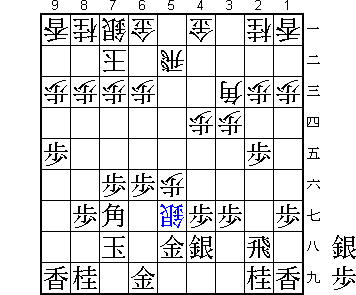 |
Diagram C
After 4... S*5g |
2... P*5f is necessary to maintain the outpost.

Instead, the forcible exchange of silvers just loses a pawn: 2... S-5f
3. S-6f P*5g 4. S6hx5g Sx5g+ 5. Sx5g S*6e 6. R-2f (Diagram D).
White's courage turns out to be misplaced.  He has thrown away his
hard-earned outpost.  It cannot be helped if such a gauche move (2...
S-5f) is ridiculed.
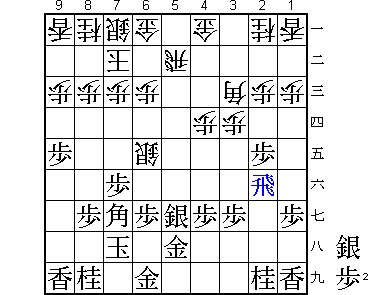 |
Diagram D
After 6. R-2f |
2... P4e is yet another attacking method.  In this case, however,
black will strongly play 3. S-6f to exchange silvers.  After 3... Sx6f
4. Px6f (Diagram E), white is worse because black can aim at a
counterattack by S*4c.  2... P*5f is absolutely necessary to secure a
foothold.
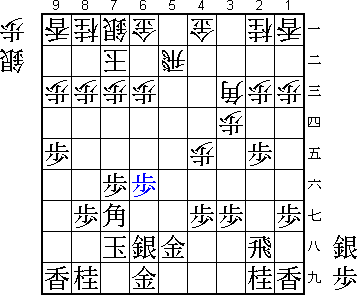 |
Diagram E
After 4. Px6f |
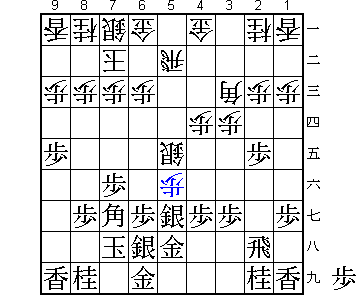 |
Diagram 2
After 2... P*5f Moves from Diagram 2:
|
Black may seem to be in danger after 3. S-6f.  It is impossible to
achieve the feat of breaking the enemy's forward base without walking
on thin ice.  The meek withdrawl 3. S-4h would conflict with black's
aggressive policy, initiated by 1. P*5g.

3. S-4f, in appearance similar to S-6f, leads near to defeat after
3... Sx4f 4. Px4f S*5g 5. G-4g P-4e 6. S*4d Bx4d 7. Bx4d Px4f 8. P*5c
R-4b (Diagram F).
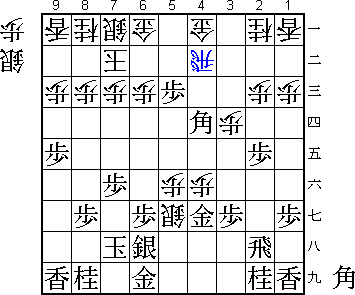 |
Diagram F
After 8... R-4b |
In the above, if black plays 6. Px4e (instead of 6. S*4d), he will be
annihilated as follows: 6... Sx6h+ 7. Gx6h Bx7g+ 8. Nx7g B*3i 9. R-5h
S*5g (Diagram G).
 |
Diagram G
After 9... S*5g |
Black should be cautious of the participation of the bishop at 3c in
the attack.  3. S-4f is not a wise move since it allows 5... P-4e,
favorably opening the bishop's diagonal.

After 3. S-6f, 3... Sx6f is imperative.  3... S-6d, bowing to black's
vigor, loses the pawn at 5f nothing: 4. P-4f G-3b 5. G-4g G-4c 6. R-5h
(Diagram H).  Naturally, white will be worse if he is deprived of his
important outpost.
 |
Diagram H
After 6. R-5h |
Another alternative is 3... P-4e.  This move, aiming to utilize the
bishop at 3c, seems like a good idea.  However, white will succumb to
the counterattack: 4. Sx5e Bx5e 5. Bx5e Rx5e 6. B*6f (Diagram I).
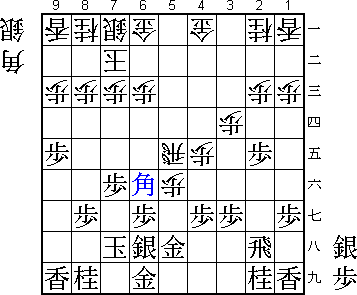 |
Diagram I
After 6. B*6f |
3... Sx6f falls into black's snare, but in order to seize the
advantage, white must place all his hopes in S*5g.

After 3... Sx6f, black can also consider 4. Bx6f.  In that case,
however, 4... G-4b (Diagram J) anticipates black's S*4c and aims at
S*5e or S*6e attacking the bishop's head.  Black cannot rid himself of
his anxiety on the 5-file this way.
 |
Diagram J
After 4... G-4b |
4... S*5g is very energetic.  Big trouble awaits if white allows
the counterattack S*4c.  If he pauses to defend, black will gain time
to solidify the 5-file and dampen white's power there.
 |
Diagram 3
After 4... S*5g Moves from Diagram 3:
|
4... S*5g is, for beginners, a most difficult attack to handle.
Often, they just give up.  The reason is that they always think to
respond directly against the attack.  Hence, if 5. Sx5g Px5g+, and the
5-file will be lost entirely.  If left as is, the 5-file will likewise
be lost to white's insistent attack: 5... Sx5h+ 6. Gx5h G*5g.

Therefore, many beginners are tempted to defend with 5. P*5i.  If then
5... Sx5h+, Black can be quite happy 6. Px5h.  Black can hardly dispel
his anxiety on the 5-file this way, however.  The attack continues:
5... Sx6h+ 6. G6ix6h S*5g (Diagram K).
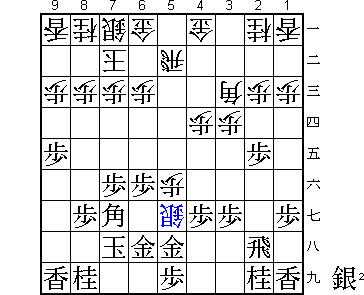 |
Diagram K
After S*5g |
5. P*5i has no offensive punch whatsoever and white can attack at
will.  Passive defence without any aggressive aim usually fails.  In
that context, in order to give black's defence a little aggressive
element, 5. S*4h may be tried.  If white responds 5... Sx5h+ or 5...
Sx6h+, black can protect the 5-file by recapturing with his gold at
6i.  Instead, white should calmly play 5... Sx4h+, and after 6. Gx4h,
attack with 6... S*3i (Diagram L).  Then black is clearly losing.
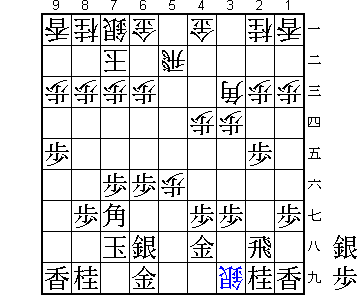 |
Diagram L
After 6... S*3i |
A somewhat stronger player may find another defensive move, 5. S*4f.
However, after the attack: 5... Sx4f+ 6. Px4f S*5g 7. G-4g P-4e
(Diagram M), black is practically defenceless.  The pawn at 4f will be
soon captured and white has the severe threat of Sx6f+.
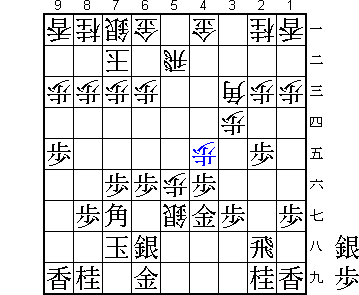 |
Diagram M
After 7... P-4e |
In the above analysis, it seems that black has no good defensive move.
Should black lose his temper and launch a wild attack with 5. S*4c, it
would only turn out as white wished.  White crashes through in the
center: 5... R-5c 6. Sx3d+ Sx5h+ 7. Gx5h G*5g 8. +Sx3c Nx3c (Diagram
N).  White's knight will journey to 4e and add strong support to the
attack.  Although black captures a bishop, white enjoys a powerful
attack.
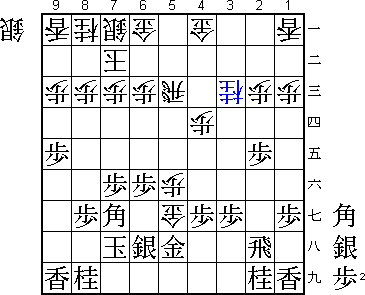 |
Diagram N
After 8... Nx3c |
Then, is the position after 4... S*5g already advantageous?  The
answer is no.  Black has one good defensive move: G-6g.  This, the
so-called "dodging defence", is an important technique.  Black,
removes his opponent's target and prepares his own counterattack.  Let
your opponent hit the air.  This is also a kendo [Japanese fencing]
strategy.  When your opponent hits the air and loses his balance, cut
him down with a single stroke.  This is the exciting essence of kendo.
5. G-6g is similar. It is hard to fight if your target is gone.  I
would like many players to learn the "dodging defence", which reminds
me of the nowadays fashionable ninja.
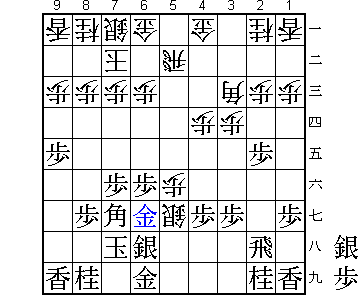 |
Diagram 4
After 5. G-6g Moves from Diagram 4:
|
White is compelled by force of circumstance to play 5... Sx6h+.  If he
defends with 5... G-4b instead, fearing the counterattack S*4c, he
forfeits his attack and black will solidify his position.  After 6.
P*5h Sx6h+ 7. G6ix6h (Diagram O) white has no pawn in hand and 5f has
become a weakling.  The former strong point is destined to be
captured.
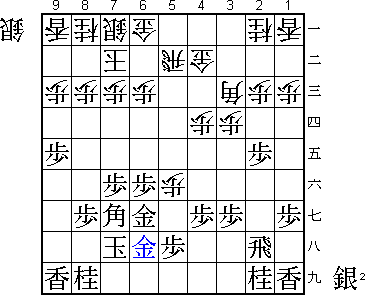 |
Diagram O
After 7. G6ix6h |
The alternative 6. Bx6h can, of course, be considered.  This may seem
a very good idea because 6... S*5g 7. B-7i threatens P*5h, trapping
the silver.  But remember: when you find a good move, keep cool and
think: 7. B-7i P-4e 8. S*7g P-4f 9. Px4f Sx6f+ 10. Sx6f Bx6f 11. Gx6f
P-5g+ (Diagram P), and although the position is not bad, white's tokin
will be very annoying.
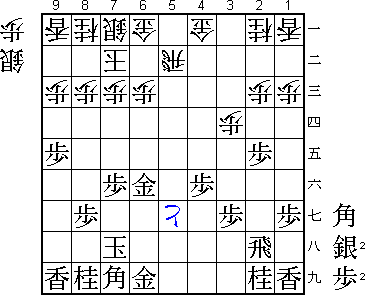 |
Diagram P
After 11... P-5g+ |
6. G6ix6h is more solid.  It prepares against the attack on the
5-file without being so sly and greedy.

6... S*5g is indispensable under the circumstances.  Stopping the
attack now would make all white's previous moves meaningless.

Black defends with 7. P*5h as planned.  If instead 7. G-6i, once again
slyly aiming to trap the silver, white will trip him up: 7... S-4f+ 8.
Px4f P-5g+ (Diagram Q).  Care is always advised.
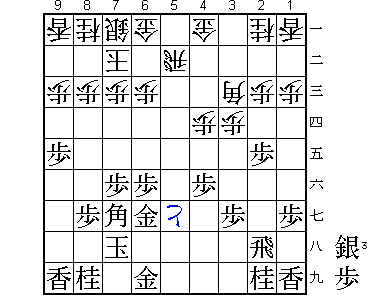 |
Diagram Q
After 8... P-5g+ |
7... Sx6h+ is forced.  Black recaptures with the bishop, contemplating
S*4c or P-2d.  The power of white's occupation at the 5-file has
dissipated entirely.  The position favors black.
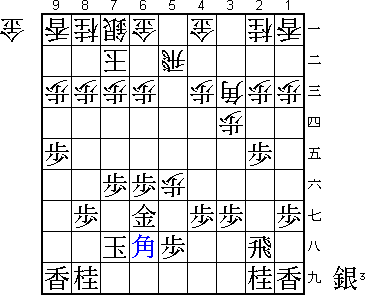 |
Diagram 5
After 8. Bx6h |
Translated by Yoshinori Sawada and Randy Andrews
[ Table of Contents | Shogi Nexus Index ]