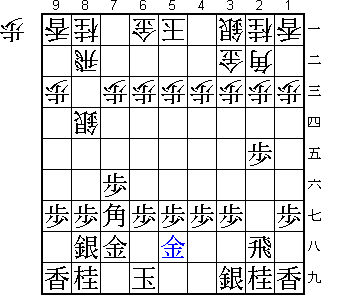
After 1. G-5h
Moves from Diagram 1:
1... S-8e
2. P-2d Px2d
3. Rx2d P*2c
4. R-2f ---> (Diagram 2)
     There are a few basics to learn about defence.  The first thing
you should learn is that simply apologizing or bowing is never
defence.  Endure it when you must, but always be alert for the chance
to counterattack.  That is real defence.  Don't be under your
opponent's thumb.  He may presume on such an attitude, and your
timidness will spur him on his attack.  Unless you forget the above,
you will learn defensive techniques naturally and gradually.  Now let
me begin my lessons with some examples.

     In Diagram 1, white is going to attack with the "bogin attack" on
the 8 file.
 |
Diagram 1
After 1. G-5h Moves from Diagram 1:
|
     At the position of Diagram 1, the most important thing for black
is to have a firm conviction that black's defence with three men,
bishop, gold and silver on the 8 file will never be broken by white's
attack with only 2 men, rook and silver.  A vague anxiety about the
opponent's attack may cause black to make a mistake.  The aim of
white's S-8e is to capture the pawn at 7f for nothing.  If this comes
true, white will easily stand better.  However, if black pushes the
pawn to 7e to avoid the attack, then black will be easily defeated
with this variation: 1... S-8e 2. P-7e S-7f 3. B-5i P-3d 4. P-2d Px2d
5. Rx2d P*2c 6. R-2f Bx8h+ 7. Gx8h Sx8g+ (Diagram A).  The reason for
this disaster is that black was too fearful of white's attack.
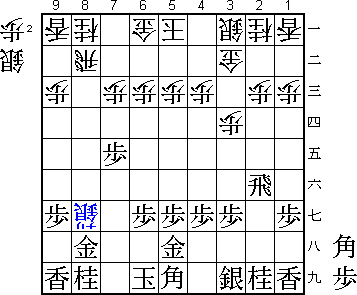 |
Diagram A
After 7... Sx8g+ |
     If white wants the pawn at 7f, let him have it!  Ignore white and
push the pawn to 2d to exchange pawns.  This move is better because
black can gain a pawn in hand, which will be used for defence in the
future.  White's 3... P*2c is indispensable.  If 3... Sx7f,
avariciously capturing the pawn, black plays: 4. P*2c S-7g+ 5. Sx7g.
(Diagram B)
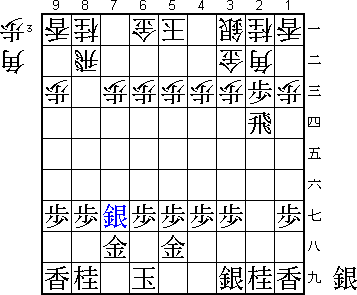 |
Diagram B
After 5. Sx7g |
     Initially white makes a profit, but a bishop will soon be lost,
so that in the end, white loses a silver.  Losing a silver at such at
early stage is so devastating that even a strong player could not win
with white.  Black's R-2f, defending the pawn at 7f, is a good move.
Black could simply play R-2f without exchanging pawns, but this is not
as profitable because black does not gain a pawn in hand.  Always play
a more profitable move, no matter how small it is.  That attitude is
the key to victory.  Beginners jump at a good move as soon as they
find it, but you should strive to make a good move better.  This idea
is needed to gain the advantage.  Calm play is always like this.
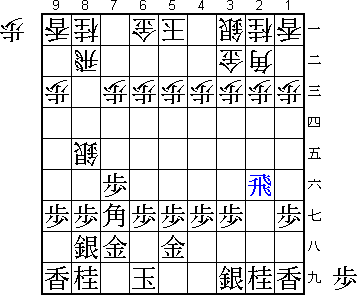 |
Diagram 2
After 4. R-2f Moves from Diagram 2:
|
     White's 4... P*8f is the move he was aiming for.  It is a natural
move that utilizes the silver at 8e.  If white plays 4... P-7d instead
of 4... P*8f, still aiming to attack the bishop's head, black will
counterattack with this variation: 5. B-5e R-9b 6. N-7g.  White's
bogin attack ends in failure.  Similarly, 4... P-3d (instead of 4...
P*8f) is also an idea.  However, the bogin still fails as white's
silver is ejected with the variation: 5. S-4h K-4a 6. B-2b+ Sx2b 7.
N-7g (Diagram D).  Most of the time, you will be defeated if you
falter in the middle of your attack.  You must resolve to accomplish
your plan even if you encounter some difficulties.  That is why white
must not consider moves other than 4... P*8f.
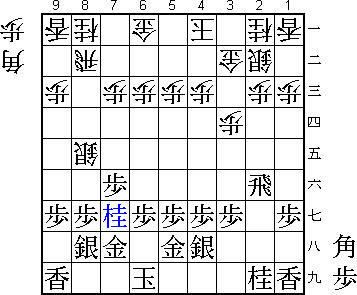 |
Diagram D
After 6. N-7g |
     At first glance, black seems to be in trouble after 4... P*8f.
If black plays 5. Px8f, then 5... Sx8f 6. B-5i P*8g 7. S-7i P-3d
(Diagram E).
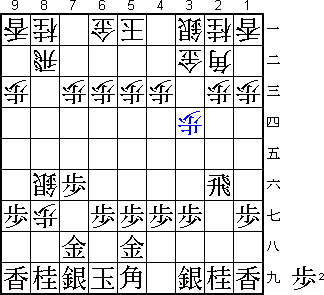 |
Diagram E
After 7... P-3d |
     At Diagram E, black is obviously worse, because he is confined by
white's pressure.  If black ignores white's 4... P*8f and plays 5.
S-4h, white will strongly occupy the 8f point and black runs out of
moves after the variation: 5... Px8g+ 6. Sx8g P*8f.  White can neither
capture nor ignore the pawn at 8f.  Then did white's bogin attack
result in success?  The answer is "no".  This is the situation that
demands a counterattacking move for defence and if you find it, you
never have to fear the bogin attack. White attacks with two men, rook
and silver, and black defends with three men, bishop, gold and silver.
Additionally, the rook at 2f is well placed for black's defence.
Naturally it must be quite easy to thwart white's attack by the
cooperation among these pieces.  The difficulty is how black lets them
cooperate.  Is there a way for that?  There is.  Activate the rook at
2f horizontally by advancing the endangered pawn at 7f.  This is an
example of "killing two birds with one stone".
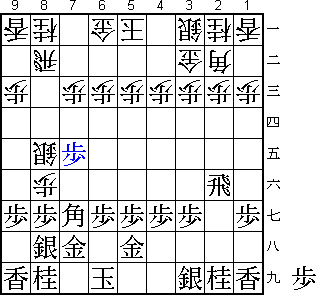 |
Diagram 3
After 5. P-7e Moves from Diagram 3:
|
     White's attack with 5... Px8g+ is very energetic.  If the pawn at
8f is captured by black, the position will be quite terrible for
white.  6... P*8f is a natural follow-up move.  With a move like the
silver at 8e retreats, it cannot be helped but to say that you do not
know anything about victory and defeat.  In Shogi, there is a move
that must be played even knowing your men will be lost.  Even if you
make a mistake after such a move, that experience will make you a
better player.  To exchange bishops and avoid the loss of a pawn by
6... P-3d (instead of 6... P*8f) fares poorly for white because of the
variation: 7. P*8f Bx7g+ 8. Nx7g S-9d 9. S-4h (Diagram F).
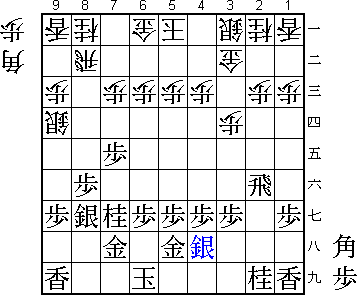 |
Diagram F
After 9. S-4h |
     A typical fault of beginners is to be fearful of a small apparent
loss.  So they avoid it, but at the cost of allowing much greater
damage that is not immediately apparent.  They will never make
progress if they continue to play that way.
     Black's 7. Sx8f is doubtless the only move to respond to white's
attack.  If black, fearing complications, plays 7. S-9h instead, then
white plays 7... S-4b 8. S-4h K-4a (Diagram G).
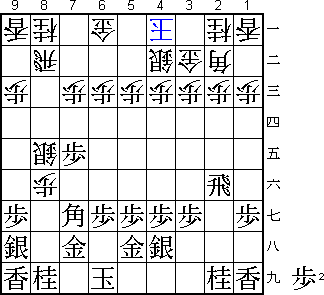 |
Diagram G
After 8... K-4a |
     White's castling will be completed and his occupation of the 8
file will gradually lead to a favorable position for him.  The
"peace-at-any-price" principle, in the case of Shogi, is never welcome
and it prevents you from making progress.
     After white's 7... Sx8f, black's 8. Rx8f instead of 8. Bx8f may
be considered.  However, it is semeai (mutual attack) which will not
be favorable for black after 8... Rx8f 9. Bx8f R*2f 10. R*8b G-7a 11.
R-8e+ (11. S*5b K-4b is to white's advantage) R-2i+ (Diagram H).
Since white has no pawn in hand, 8. Bx8f is better.
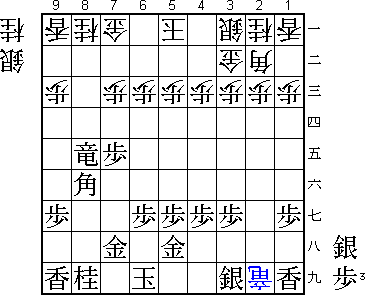 |
Diagram H
After 11... R-2i+ |
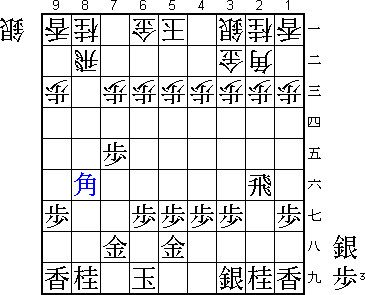 |
Diagram 4
After 8. Bx8f Moves from Diagram 4:
|
     This is a good time to utilize white's bishop by 8... P-3d.
Cooperation of rook and bishop is, above all, important to succeed in
your attack.  Beginners are apt to forget about this cooperation,
although they are worried about the utilization of their rook and
their bishop separately.  Such planning does not work effectively. For
instance, instead of 8... P-3d, white can try attacking by 8... S*9e.
However, white will be defeated with this variation: 9. Bx9e Rx8i+ 10.
G-7i +R-8e 11. R-8f +Rx8f 12. Bx8f R*2f 13. R*8e Rx2i+ 14. S*2h
(Diagram I).  White's promoted rook is locked on 2i, and black
threatens both Rx8a+ and S*3h.  In the above variation, if 10... +R-9i
instead of 10... +R-8e, black plays 11. S*8h +R-9h 12. S*8g (Diagram
J).
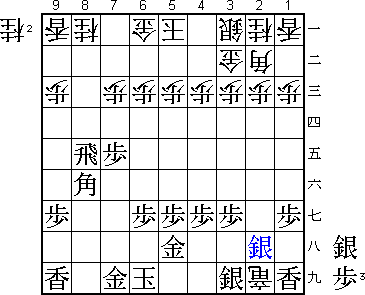 |
Diagram I
After 14. S*2h |
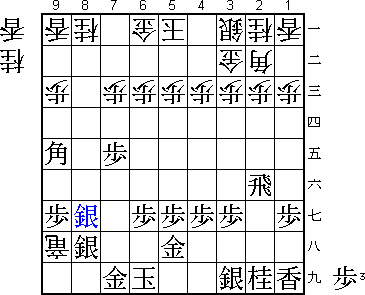 |
Diagram J
After 12. S*8g |
     White's promoted rook will be captured.  On the other hand, if
white played 11... +Rx9e capturing the bishop, instead of 11... +Rx8f,
black would play 12. Rx8a+ aiming for mutual attack.  This is
disadvantageous for white because his castle is weak.  I am sure that
after studying this example you understand well that the attack by the
rook alone does not work at all.
     Black's 9. P*8h is a strong defence.  Pushing the pawn to 6f
carelessly allows the bishop at 8f to be captured for nothing, and 9.
N-7g is dangerous because it blocks the bishop's retreat.  Defence
should be as strong as possible.  At diagram 5, white's bogin attack
looks like a complete failure.
 |
Diagram 5
After 9. P*8h Moves from Diagram 5:
|
     White has only a silver in hand.  Sadly, he has no pawn in hand
so no clever attack by white can be found in this situation.
Furthermore, if black pushes the pawn 10. P7d, white will be
overwhelmed because of black's threats 11. B-5c+ or 11. P-7c+ Nx7c 12.
P*7d.  It is quite regrettable for white to give up the attack, but
protecting the 5th file by 9... S-4b is imperative.  Forcing the
attack by 9... S*8e in frustration will never be effective because
black defends as follows: 10. B-6h S-7f 11. K-7i (Diagram K), and the
silver at 7f will be captured soon.  Most of the time, attacking
prematurely gives an opponent a chance to counterattack, so attacking
should always be started with a proper evaluation of the outcome.
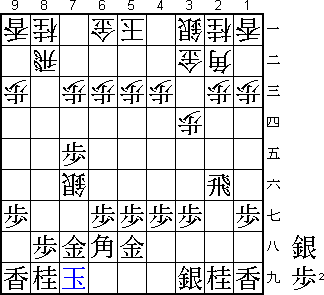 |
Diagram K
After 11. K-7i |
     In the above variation, 10. B-7g Bx7g+ 11. Nx7g instead of 10.
B-6h seems better as the knight at 7g is threatening the silver at 8e.
However this defence is not favorable to black, because white will
move the silver to 8f aiming at B*4d or Sx7g+ (Diagram L).
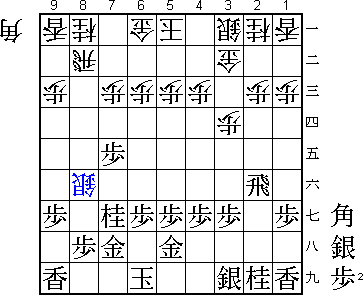 |
Diagram L
After 11... S-8f |
     Also in the same variation, if black captures the silver
immediately with 11. Rx7f instead of 11. K-7i, he will be strongly
attacked by 11... Bx8h+.  This is a problem for black.  In any case,
an inviting move is apt to have a pitfall.  It is very important to
make it a habit to cool down and think. Again, don't be overcome with
greed and move without thinking.  Instead of white's 9... S-4b, 9...
B-4d in order to evict the rook at 2f and capture the bishop at 8f for
nothing may be considered.  However the rook will escape to 3f, and
then to 7f if white attacks the rook again by 10... S*4e. (Diagram M)
White's effort will be wasted entirely.  Remember to correct the
weaknesses in your position when no attacking move is found.
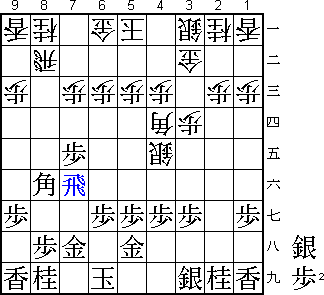 |
Diagram M
After 11. R-7f |
     After white's careful defence by 9... S-4b, black's bishop at 8f
is no longer effective.  If anything, it has become a cumbersome piece
that will make a good target for white.  That is why black moves the
bishop to 7g, offering to exchange bishops.  The bishop can work more
effectively in the future if it is in hand.  The movements of the
pieces on the board are limited, but the pieces in hand are more
accommodating.  If a piece on the board is not working, be alert for
an opportunity to exchange it.  Now, at the position after the bishops
were exchanged and black played 11. Nx7g, white has no good attack.
His bogin attack has failed entirely.  In other words, black's defence
was very successful.  After this, if black aims at attacks such as
B*5e or R-7f, he will gradually lead the game.  Black is advantageous
because white has no pawn in hand.
 |
Diagram 6
After 11. Nx7g |
Translated by Yoshinori Sawada & Randy Andrews
[ Table of Contents | Shogi Nexus Index ]